
“Macro” is my keyword. In many situations I’m tight-lipped, but when it comes to macro I’m hard to shut up. Feel free to test me 🙂 Like anglers’ tall tales or war stories. That’s why I enjoy answering the questions I get as best I can. But there’s one that, since the “Makro Dünyası” website launched, is perhaps the one I’ve been asked the most—the biggest of all the questions. Which in turn demands the longest answers. It’s like a Q&A game with no end in sight—and there won’t be.
I’ve provided large-size links for most of the photos used in the article. Click to open them at full size and examine the details.
The question is still huge. It says, “No one can handle me without writing a separate, extensive article.” I won’t try to “handle” it either. I’ll apply the time-honored strategy: divide et impera, i.e., “divide and conquer”…
After gearing you up and sounding like I’ll wax philosophical about the meaning of life, let’s ask, helplessly:
What equipment should I buy for macro photography?

The more options there are, the harder the choice. Since making a sound choice means reviewing all the options, whether you’re new to macro or someone who’s loved it for years, this question will keep popping up. It will bring sweet dreams and blown budgets. And our aim is to save as much time and money as possible from going down the drain.
Now suppose someone asks me, “Which macro lens should I buy?”—as they often do.
First I check whether they’re serious—which they are.
And then I start asking:
1. How are motivation, patience, perseverance?
2. How much shooting experience do you have?
3. What gear do you already own?
Depending on those three, the answer may have shrunk—or grown to the size of a mountain. Then come my purpose-driven questions:
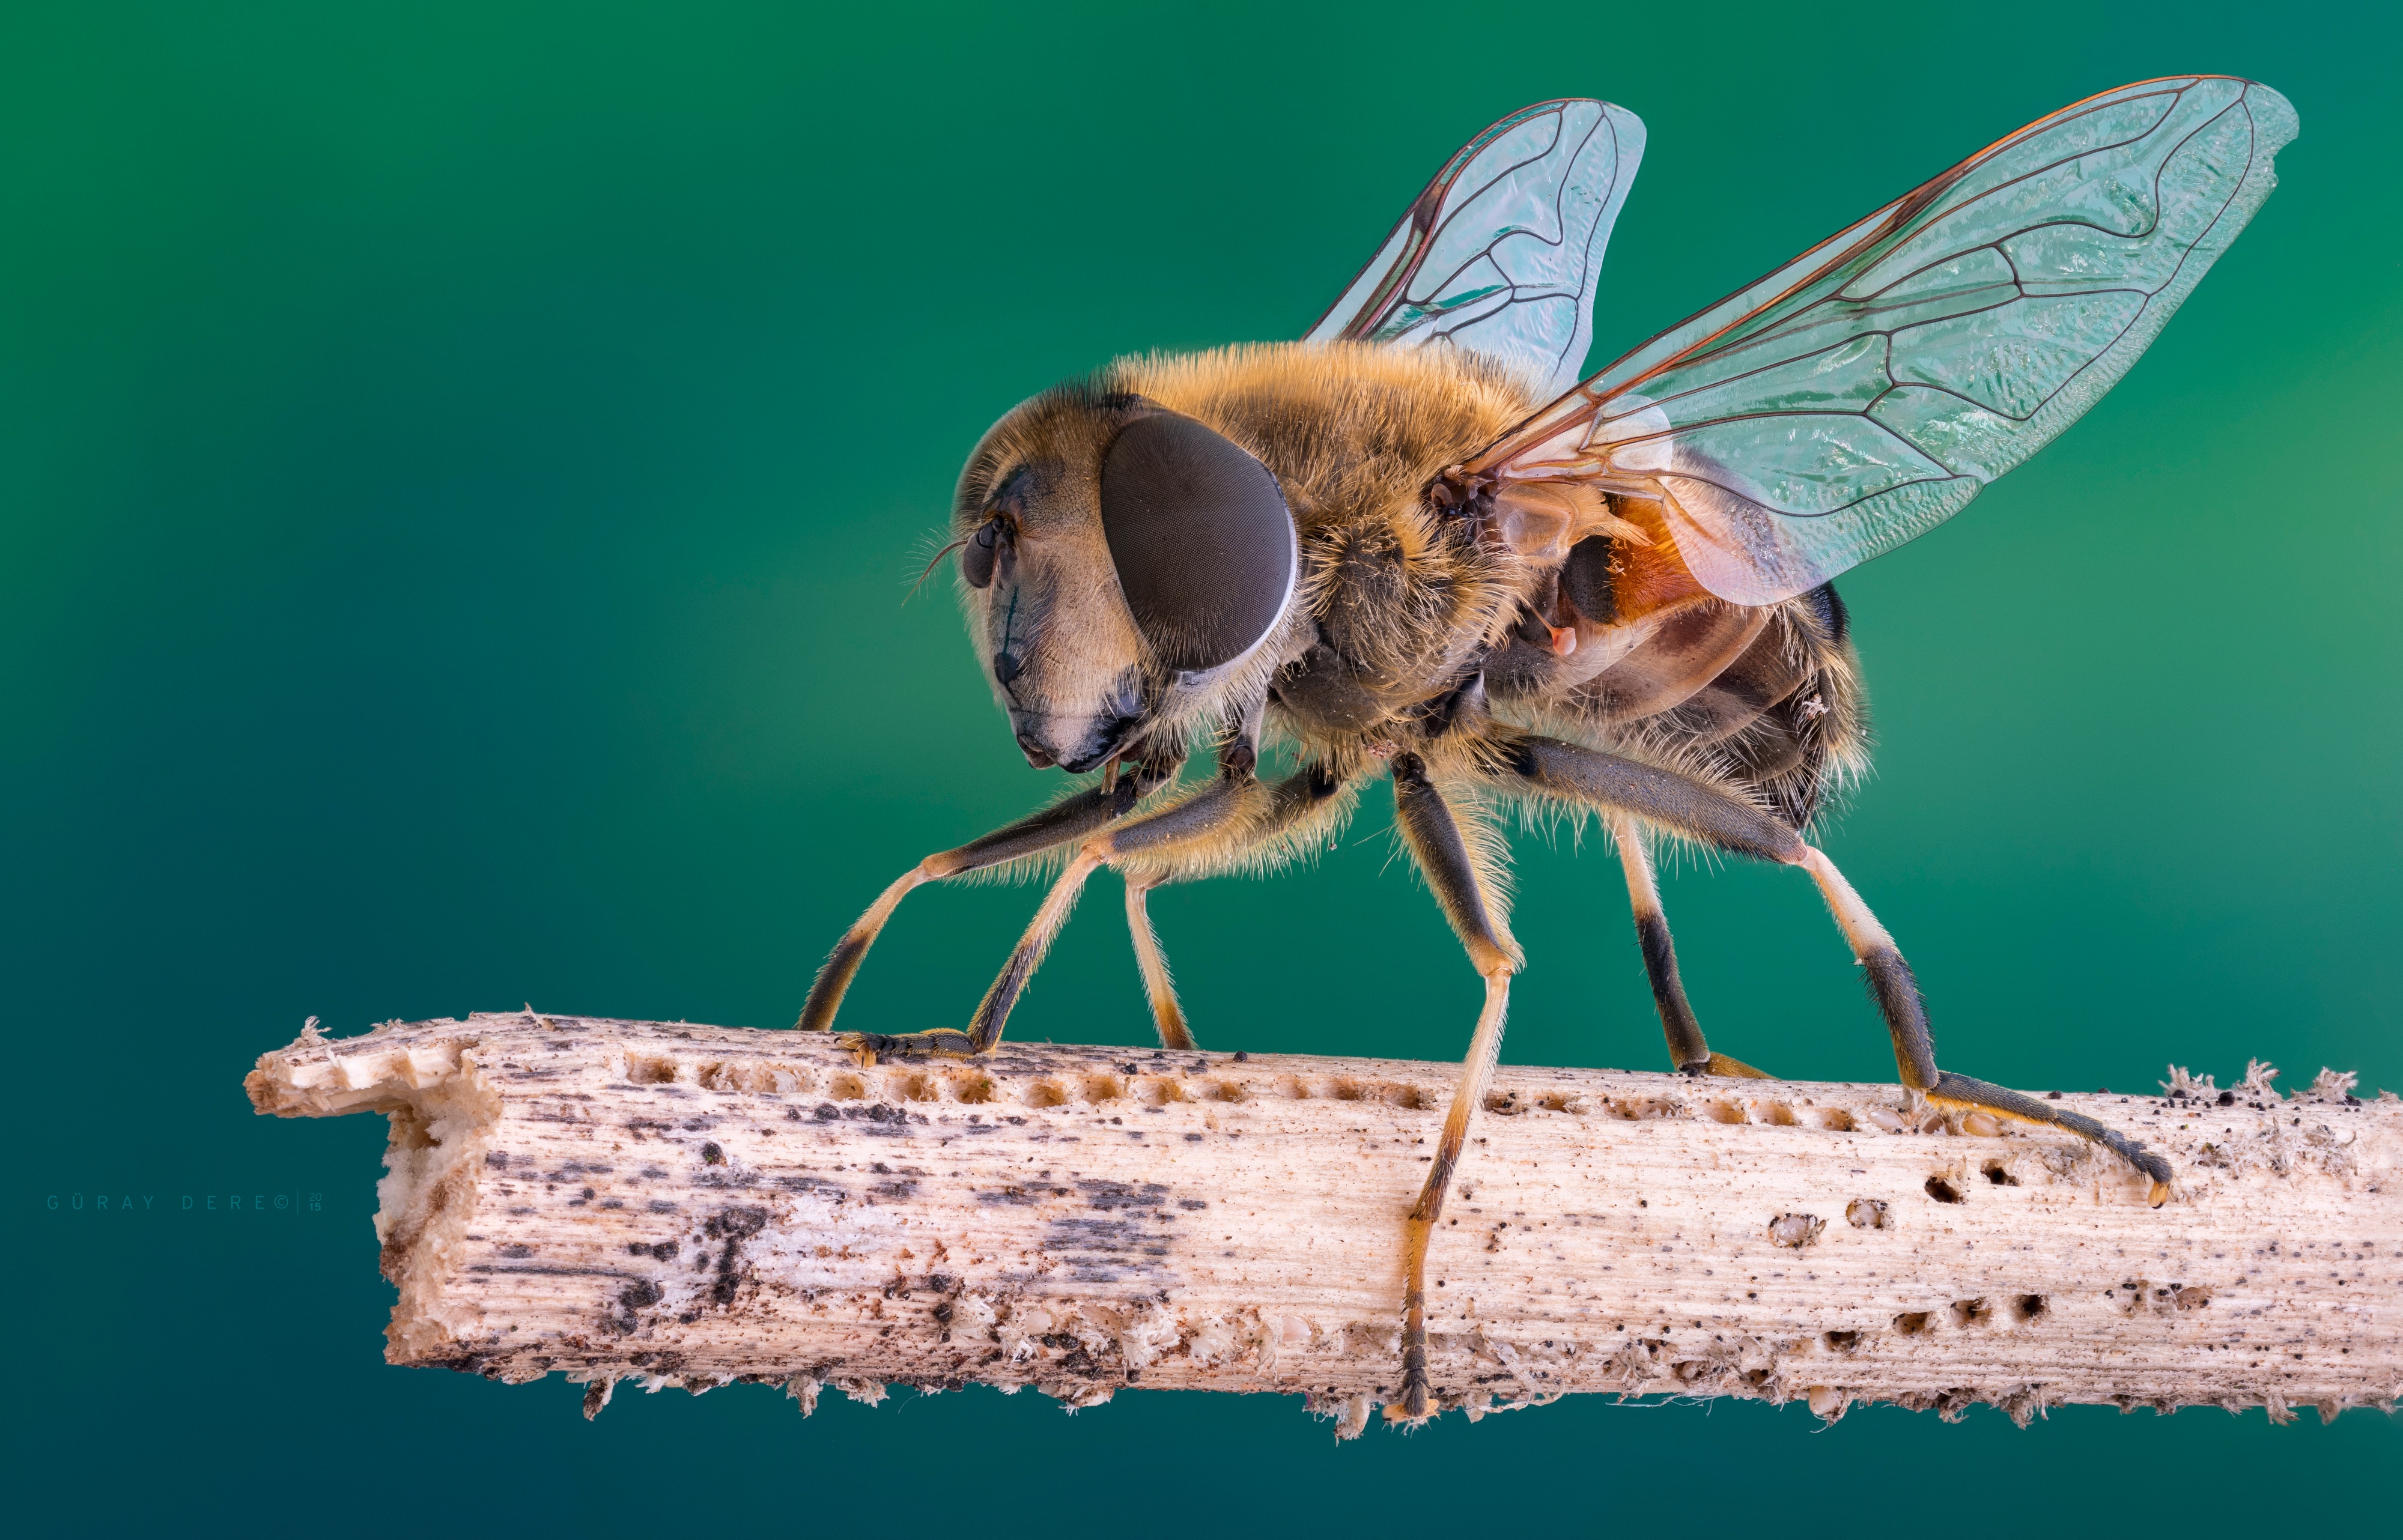
4. What do you want to see in the photo? A nice flower with a bee on it? The bee itself? Maybe a bee portrait from the side! Or even the tiny hole at the tip of the bee’s stinger!
5. Will you shoot in the field or in a small home studio?
6. Handheld or tripod?
7. What’s the budget? Comfortable and expensive solutions? Or cheap but fiddly ones?

Question 1: interest, motivation, patience, etc.
While they think about those, I also buy time to figure out where to start—for an answer that, to be honest, I don’t fully know and that has no real end.
Meanwhile, I see the 100,000 shots I’ve taken flicker before my eyes like a film strip; at 25 frames per second in PAL, that makes a 67-minute film.
The answer to this first question on the list is actually the answer to the others too. Admit it—some of you are getting bored already. 🙂
Sometimes I get a question and reply, “I cover that in detail in such-and-such an article,” and share the link. And sometimes the response is, “I don’t have that much time—just answer this one question instead!”
Yet if you add up the total hours spent finding, chasing, and shooting each bug and processing each image—the hours behind every single frame of that 67-minute “film”—I actually did the math: it averages 2,000 hours. In that time you could walk the distance from Edirne to Kars and back six times… or cycle around the world. Hunting for gear, reading, researching, testing… The one hour that flew by just to get the article to this point… all not included.
Apparently people spend more than 9 years of their lives watching TV. 80,000 hours! Thankfully I don’t have a TV at home. So I’ve still got 78,000 hours I can devote to macro! A bit optimistic? You be optimistic too—make time 🙂
In short, this is my answer to the first question: Macro will demand a lot—really a lot—of time. For those who love it, it’s joy; for those who don’t, it’s torture. Best to know that well.
If you get bored, at least you’ll have learned right from the start. No other hobbies out there? 🙂
Question 2: photography knowledge / experience
Knowledge is power everywhere. Knowing the rules behind a photo accelerates learning. As your knowledge grows, you’ll encounter “trial and bull’s-eye” more than “trial and error.” You won’t be baffled by mistakes—you’ll have an idea why they happened. So first acquiring basic photography knowledge is a good thing.
With macro, we need to push technical limits a bit. Understanding how lenses work and a bit of their internals helps you grasp those limits. You can ask Google about this part as well—though anything with “macro” in it, Google tends to point here anyway! 🙂
Speaking of Google, I can see the search terms for visitors arriving from Google. It doesn’t show who searched what—no identities, don’t worry. But you wouldn’t believe what people try to shoot with macro. 🙂
After the technical foundations come topics like lighting, vibration, framing, background—general photography experiences that develop with lots of shooting. What you shoot doesn’t matter. But finding insects, preserving them if dead, staging them, and other techniques used in shooting are all topics that require macro-specific experience. You can’t develop these just by reading this paragraph. You’ll know what they are, think it’ll work when you try, and it won’t. You have to make it work by trying repeatedly, then trying new things.
Next comes processing the photos: an archive structure you won’t get lost in, backups, RAW–JPEG conversion, focus stacking, final touches and cleanup with image processing software. These will improve and speed up with both research and practice. After a while you’ll be ashamed of your first shared photos and wonder if you should delete them… or so I hope! 🙂
Question 3: gear on hand
When people see a good photo, they usually ask right away: Which lens? What are the EXIFs?
Yes, a lens makes a difference. But the main difference-maker is us. I think my explanation in Question 1 is long enough.
Up to here I’ve tried to spook you by talking about the difficulties. If you’re not spooked, we’re good—time for the fun part.
I evaluate gear in three ways:
- Things I already have
- Things that will let me do something I couldn’t do before
- Things that will let me do what I can already do, but more comfortably
Here we’ll start with the first: what we have. Since we have no other choice, we’ll use what we’ve got. And gear will develop slowly. That slowness matters. Hand one of us 50 lenses and say “We’re going out for macro—pick one!” and they’ll be lost. So we’ll begin by getting to know our gear slowly and one by one.
Every option has strengths and weaknesses. The “best” depends on purpose and conditions. We need to choose the one that best serves our purpose among what we have. To do that, we’ll start by giving everything a chance and getting to know it. There are methods to push pretty much all lenses into macro: using extension tubes/bellows, adding a Raynox, reverse mounting, etc.
More than once I big-talked and said you can’t shoot macro with a zoom—throw out your 18–55s and 70–300s. I’m now eating those words with relish, because yes, you can. Twice, out of sheer stubbornness but without prejudice, I gave lenses that had nothing to do with macro a fair shot. Both times yielded an article. The two photos below are from those sessions.


The first is an old 80–250 mm zoom I bought for 30 euros. For the story, see macro with a cheap zoom.
The other is the 18–55 kit lens many of us have. For details, see macro with an 18–55 kit lens.
Every lens has a certain aperture that gives its best image at each magnification step. For instance, with the kit lens I got the best results at f/8, and with the 80–250 at f/16. Yours will differ. With solid research—or failing that, good tests—you can discover these values and use them in your macro work.
The 50 mm “nifty fifty” many of us own is even better for macro. Being a prime, its sharpness is top-tier. When reversed, it approaches true macro-lens performance. If you have a 28 mm, reverse it on a tube and you’ll be working around 4×. It’s not easy, but the results are impressive. I’m sharing three handheld examples shot with a Pentax SMC M 28 mm using reverse mount and flash. These are from my earlier days—you can see areas where depth of field is lacking. But with handheld focus stacking and a reversed 28 mm, getting everything sharp is really hard. Studio setups can do much better.


So what if all you have is a compact camera? …
What do you mean “what if”? Then you use it. Fixed-lens compacts aren’t bad at macro at all. In fact I wish I had one on hand. With add-ons like a Raynox, their macro capability can be pushed even further. They can even rival DSLRs for video. In video, the small sensor’s greater depth of field is an advantage. Even a 10-year-old camera managed to entertain me a lot. The photos below were shot with a standard Canon PowerShot A85 with no lens add-ons.


And if you don’t have a camera at all? Do you have a phone? A tablet? With small, very inexpensive clip-on lenses you can do a lot. See: Macro with a cellphone
Ultimately, though, you should find a way to get an interchangeable-lens camera. Depending on budget, look for the most advanced model you can—but especially models that offer advantages for macro. For example, an electronic shutter is very important for macro. Some Canon DSLRs and Olympus, Sony, and other mirrorless bodies have it. It prevents vibration and greatly helps sharpness. It’s essential for anyone planning high magnification.
With a mirrorless body you can see the image as it will be before you shoot. Color and exposure balance can be monitored during shooting with no surprises later. And I think full-frame bodies gather more detail. Imagine two different bodies—one full-frame, one APS-C—framing exactly the same scene. Because the APS-C sensor is smaller, the image forming the frame must be crammed into a smaller area, and diffraction issues will start sooner. For the same reason, full frame performs better in low light. In natural-light shooting you can raise ISO a bit and speed things up.
Does APS-C have no advantages at all? It does—since it crops from the center, you’re effectively “closer,” i.e., more magnified. And depth of field is greater. That means you can focus stack with fewer frames.
Personally, even if it requires extra effort, I prefer higher detail. So I say full frame.
Question 4: what magnification is desired?
What would you think if I said, “Macro isn’t a magnification contest!”?
You’d probably give sensible answers like “Right, the subject and framing are what matter.” But our inner voice shouts, “Not enough! Closer, closer, closest!” We keep talking about those photos—“Dude, he shot the fly’s eye!”—and keep hitting Like on them most.
Someone is surely saying, “Oh please, I’m not jealous.” They’d say that because they’ve already tried 10×, 20×, all of it.
These are all phases. Testing limits is great. Pushing magnification a bit further, forcing yourself to learn, seeing how far each setup can go—that’s great too. After you try all this, magnification finally stops being a contest, and that’s when you genuinely say, “It’s about subject and framing.” (But we never stop shouting, “Dee-taaail!”)
In response to this question, I’ll discuss only the lens system. I suspect this is what people are most curious about. Let’s roughly talk about magnification ratios and lens systems suited to them.
Note: The sample photos below are “manufactured” with proper technique, which is why they’re very sharp. If you buy the lenses I mention and expect this result immediately, you may be disappointed. I’m not saying this to boast about my photos—I want to remind you the lens is only one part of the job.
4.1 Lenses for wide-angle macro

Shots with wide-angle lenses have an interesting trait: they distort perspective and make it feel like we shrank and stepped into the scene. Unlike traditional macro, the background remains quite present. Thus we frame the insect along with its habitat, as it is. Magnification is usually under 0.5×, but both the shooting and viewing pleasure are very high. In any weather, we can finish quickly with a single handheld frame.
Options:
- Wide-angle macro lenses. Not many models exist. The Laowa 15 mm f/4.0 is the main example so far. It’s expensive and hard to use—but very sharp.
- 28 mm or wider everyday lenses. Add a thin macro tube behind them to force closer focusing. With a helicoid adapter, mirrorless bodies offer a perfect solution.
- Relay lens systems. Tiny fisheye lenses like CCTV camera lenses can be combined with other macro solutions. Countless possibilities. Very hard and not yet fully “solved.”
4.2 Lenses for low-magnification macro

Using the example from the start: if we’re shooting a bee with its flower, we’re working at 0.5× or less. Technically, below 1× isn’t “macro,” but we’ll use it a lot. For larger subjects like flowers, fungi, frogs, snails, butterflies we need low magnification. The good news is you don’t need a macro lens for this. But sharpness and detail always matter. Options:
- Macro lenses. The best option. Sharp even in the corners with high micro-contrast. Example: Tamron 90 mm macro.
- Older “semi-macro” lenses. These are much cheaper than modern lenses and very sharp. Examples: Volna-9 50 mm f/2.8; Vivitar Series 1 90 mm f/2.5 macro (a legendary lens).
- Macro zooms. Not true macro lenses, but they can do nice close-ups. Usually not great in sharpness and bokeh. Sharpness falls off away from center. Example: Tamron 70–300 Macro f/4–5.6.
- 50–100 mm primes. On their own they may not get close enough. Add-ons like the Raynox DCR-250 help. Their sharpness is satisfying. Example: Konica AR 50 mm f/1.7.
- 80–150 mm enlarger lenses. Use reversed. They deliver top-tier sharpness—on par with modern macro lenses. As focal length rises, magnification drops; e.g., 80 mm magnifies more than 150 mm. Adjust tube length to the desired magnification. These are my personal favorites. Example: Rodagon 150 mm f/8.
4.3 Lenses for 1:1 macro
1:1, i.e., 1×, means the subject’s real size equals the size of its image on the sensor. At 1× on full frame, an object 3.5 cm long exactly fills the frame. On APS-C it’s about 2.5 cm. So a 2 cm bee will almost fill the frame. From this magnification onward, you won’t be able to render the whole bee sharp without focus stacking—depth of field won’t allow it. Options again:
- Start again with macro lenses. Their no-add-on upper limit is usually 1×. As I said, they’re very sharp.
- 50–100 mm primes reversed. Not macro lenses, so corners will show it—but still very good.
- 50–100 mm enlarger lenses reversed. Very sharp. Among all my lenses, my favorite Componon-S 80 mm is phenomenal in this range.
4.4 Lenses for around 2×–3×

Here we enter “extreme macro.” We’re mostly going for insect portraits. Things get harder: long exposures due to low light, a dark viewfinder, very short working distance, razor-thin depth of field—plus an unpleasant introduction to vibration. A typical studio session will require focus stacking with 50+ frames. As for lenses:
- Add-ons like the Raynox DCR-250 on macro lenses can push magnification to 2×—but not much further.
- Reversed normal lenses. A 50 mm can reach this range on a somewhat long tube. If you have a 28 mm, it climbs to ~4× with much shorter tubes.
- Reversed enlarger lenses. This is the range I work in most, and my top choice is enlarger lenses. 28, 35, 40, 50, 60 mm lenses all work well here.
- Add a teleconverter behind any lower-magnification setup to increase magnification—but it will hurt sharpness.
- Canon MP-E 65 or later high-magnification zoom macros. The MP-E is a very sharp, specialized macro lens. It gives 1×–5×.
4.5 High-magnification lenses for 4×–10×
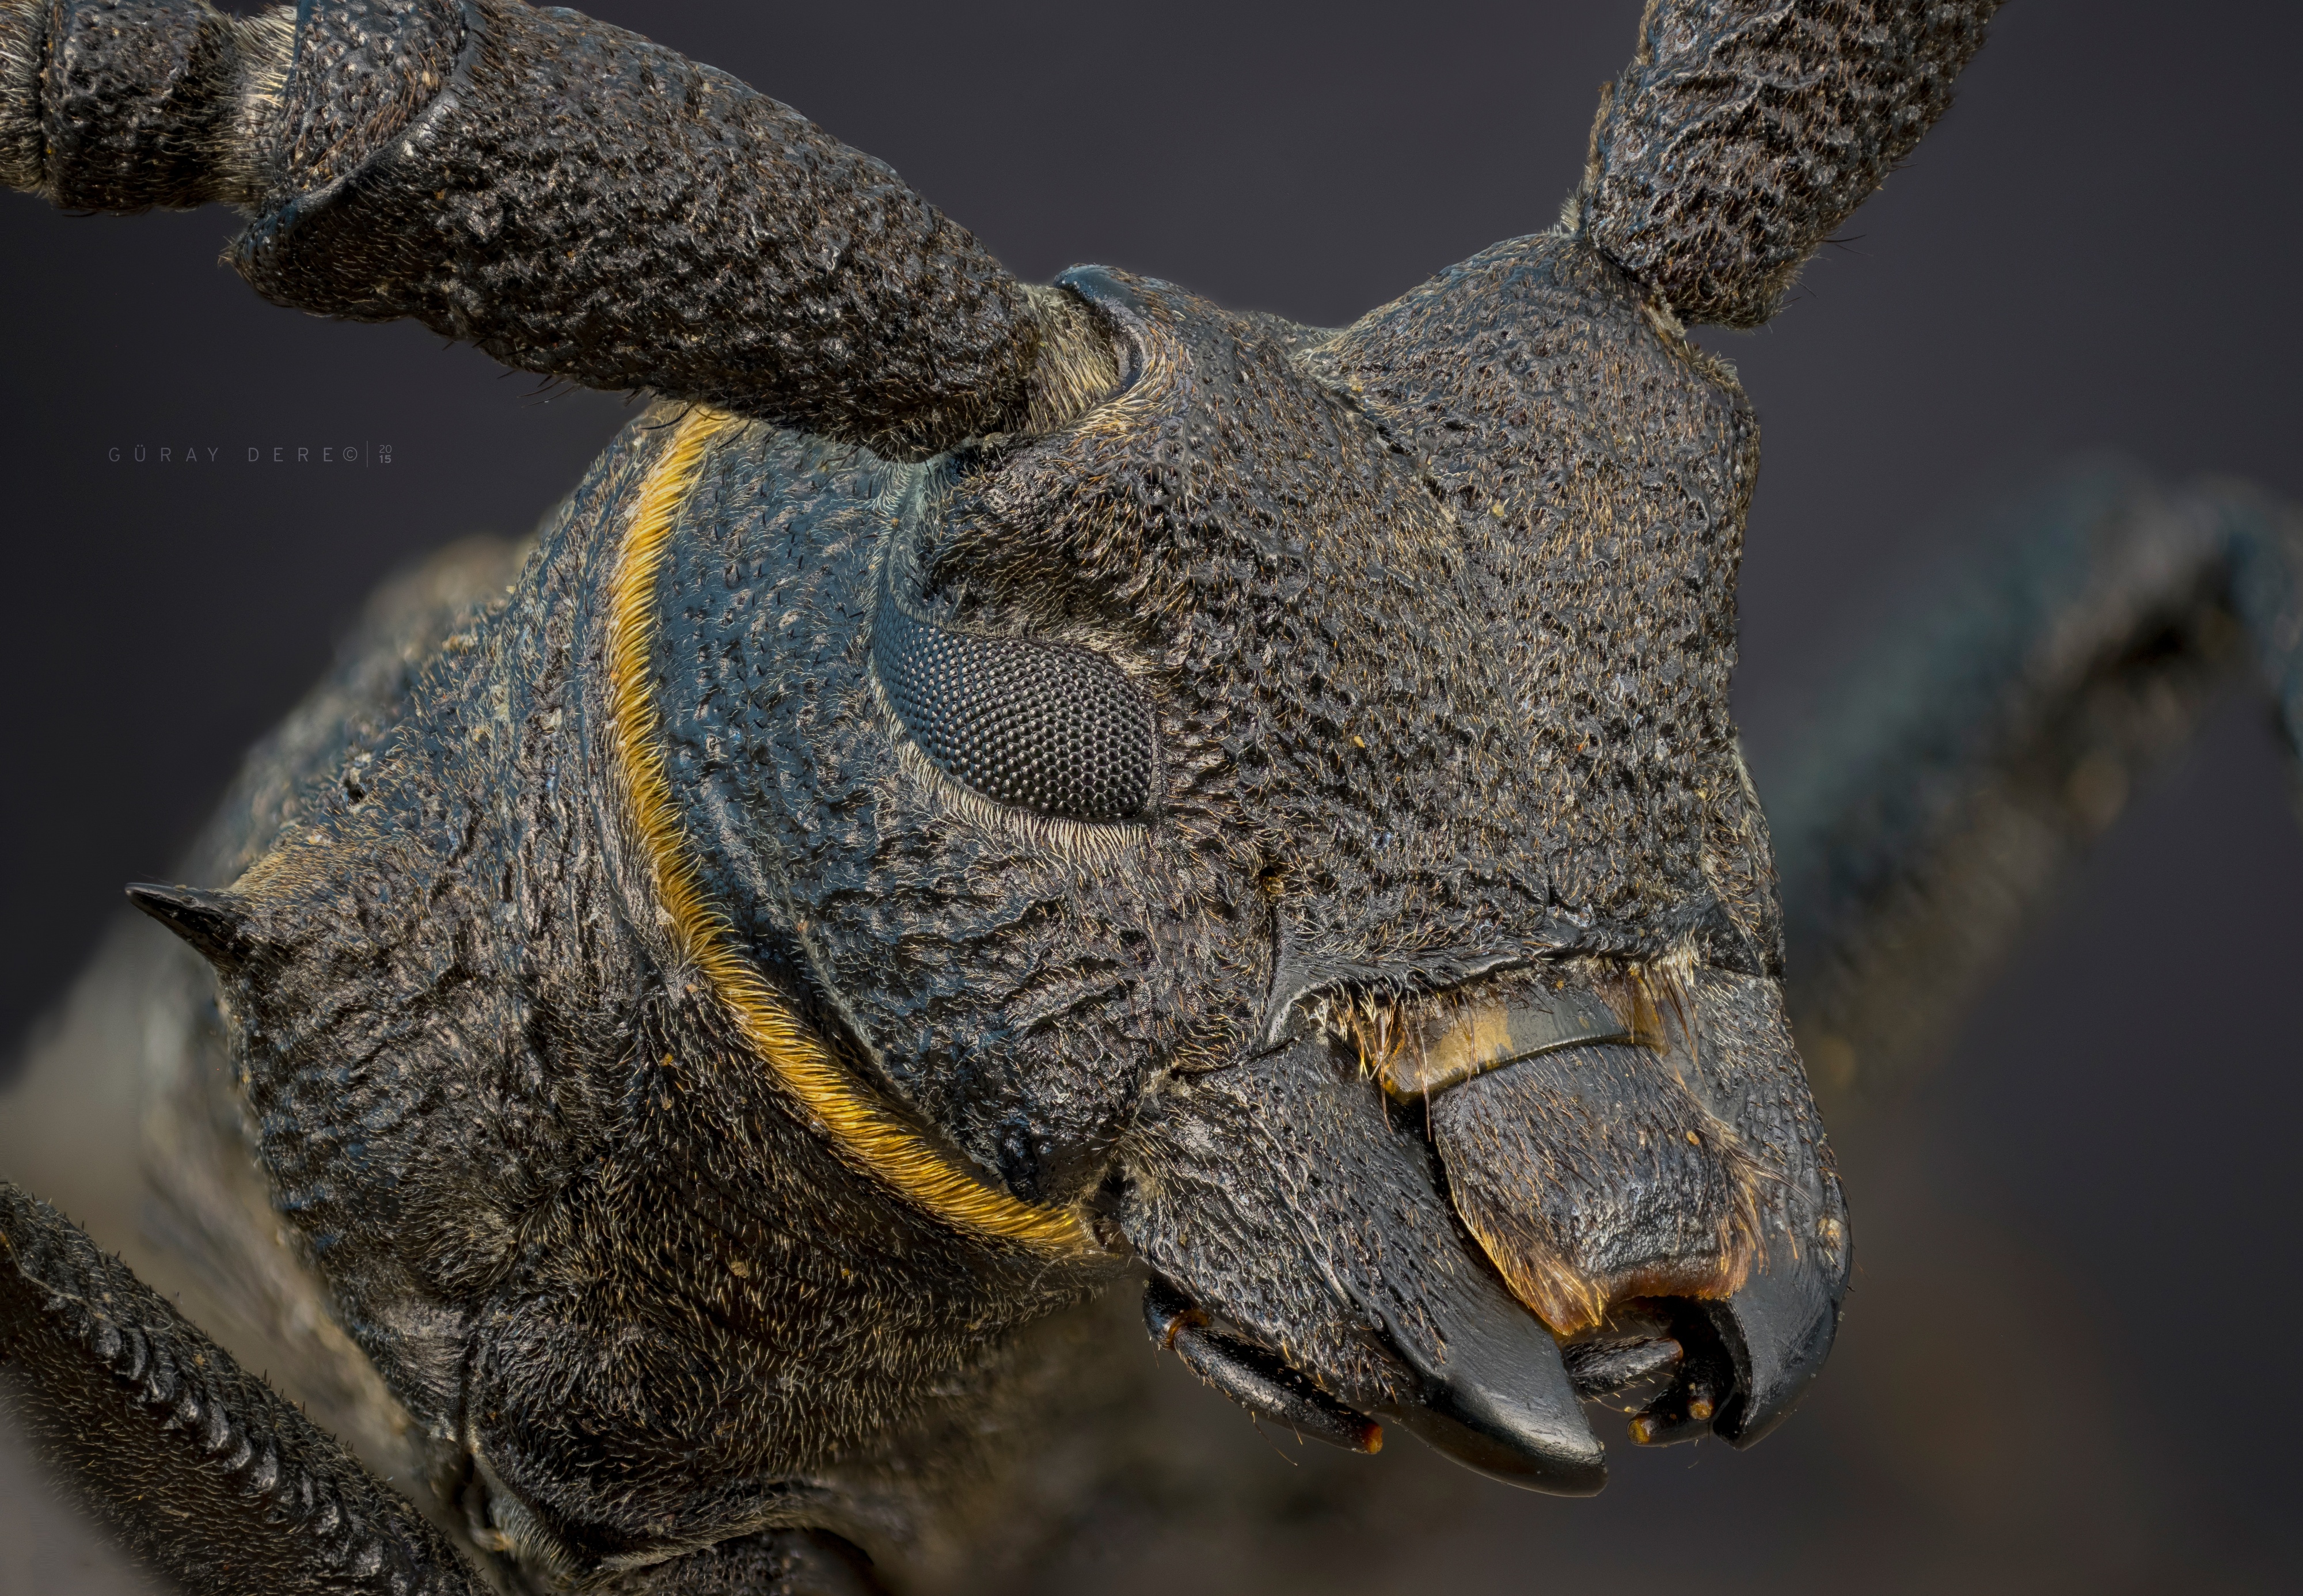
The 4×–10× range is our “detail-work” level. We use it to see close-up details of specific areas of subjects and creatures. The results are striking—full of surprises. You’ll witness details you’ve never seen before: an ant’s mandibles, the feet of hard-shelled beetles, a mosquito’s antennae… You’ll set out to shoot a bee and be surprised by mites and pollen hidden in its hairs. Sometimes no one but you will guess what the photo shows. A typical stack is 100–200 frames. With lenses that have an aperture, you can stop down to increase depth of field and reduce frame count—but sharpness will also drop.
- Canon MP-E 65 goes up to 5×.
- Wide-angle enlarger lenses like 28 mm can easily go to 4× and beyond.
- Microfilm lenses. These tiny lenses can give surprising magnifications. They’re hard to mount on a body. Example: Otamat101 20 mm f/2.8.
- Push lower-magnification systems with long-throw bellows, a double set of extension tubes, or a teleconverter. Quality drops, but the results can still be impressive.
- Specialized bellows lenses like Zeiss Luminar, Zeiss Photar, Canon Macrophoto cover a wide high-magnification range. All are excellent options.
- And the main option: microscope objectives. There are many choices at different magnifications. In sharpness, other lenses can’t compete. For example, the Lomo 3.7× is superb.
I’ll give another example to show what can be done by pushing a lens that normally doesn’t belong in this class. I used an El-Nikkor 50 mm f/2.8N enlarger lens on fully extended bellows, plus a 2× teleconverter, for a total of 8×. But if you open this and the sample above side by side and inspect the details, you’ll immediately see what I mean.

4.6 Lenses above 10×

We’ve now arrived at the bee-stinger-tip-hole level. This realm belongs entirely to microscope objectives. There are objectives up to 150×. But not all are suitable for photography. Many focus so close they’d touch the subject. A good portion also doesn’t render color correctly. In other words, just the objective without an ocular often doesn’t work properly on a camera the way it does on a microscope. One way or another, this magnification region will be very, very challenging. I wish we had a photo album of everyone’s facial expressions during their first attempts above 10×—we’d have a blast 🙂
- The only real option is microscope objectives. Anything else is just stubbornness. Within that, there are two approaches.
- Use an objective on a bellows or tube in front of a lens, the traditional way. You get the magnification the objective allows. Above ~20×, micrometer rails start to fall short. You can use vertical setups built on microscope stands. That way, you can do focus stacking comfortably with the microscope’s own very precise rail.
- Use the microscope’s ocular as well—or an ocular replacement adapter—to multiply magnification tenfold. When we look through a microscope with our eyes, we use the ocular, so those big magnification numbers (like 1000×) don’t surprise you. With the extra ocular here, sharpness drops a bit, but your insect album gains paramecia and bacteria too. And of course, those wonderful microbe videos can be shot.
We’ll end lens selection here. Which did you choose? Let me guess… “All of them”? Congratulations—welcome to the club 🙂
Question 4: field shooting or home studio?
For this question I’ll again stick to lens-specific explanations. The accessories hide in later questions. Notice I won’t name lenses either. Those planning to shoot outdoors or at home can evaluate lenses against the traits I’ll list.
4.1 Shooting in the field

Outdoors, you have a magnification ceiling. Above 4× is very hard. If the target is a live insect, above 4× is almost impossible—except if you go out early on frosty mornings in the right season and find insects trapped in ice. Then it’s possible—still tough.
Briefly, we eliminate microscope objectives outdoors. We’ll turn to lenses with apertures so we can stop down and sacrifice some quality when we need to hurry. Let 10 frames do the job instead of 50 if need be. And believe me—you’ll always be in a hurry.
Another requirement in the field is focusing on portable, robust options. Systems with many stacked parts, heavy, bulky, liable to fall apart will ruin your day. Rigs should be rock-solid, with tightly interlocked parts that don’t flex or bend. The smaller and lighter, the better.
There’s no need to describe the joy of being out in nature. Despite the technical challenges, work done outdoors with natural light yields results that are superior, hands down. It gives you, as the photographer, a deep sense of satisfaction.
4.2 Studio shooting

It’s your home—no one can tell you what to do. I won’t either. Everything goes! You’re free to create the chaos you want. Studio work is an inseparable part of going all-in on macro year-round, regardless of light and weather.
Question 5: handheld or tripod?
Anyone among us with tripod-steady hands? If so, you can skip this section. 🙂
5.1 Handheld
If you’re shooting handheld, you’ll face issues with shake and light. They’re linked: if light is insufficient, exposure time increases, and hand shake will blur the image. But if you pour on strong light, you get harsh glare and reflections. For instance, if you shoot a bug under direct sunlight, you’ll end up with blown highlights and washed-out colors. Light must be both sufficient and balanced. As magnification rises, these problems multiply. So for handheld, it’s wise to keep magnification below 3×. Even that’s tough. Here are a few possible solutions.

Use a flash. This is probably the strongest solution for handheld. An external flash with a diffuser in front always gives a well-lit scene. We won’t allow direct sunlight on the subject, and even at midday in summer we’ll use flash for handheld. If we keep the shutter around 1/80 s on average, we can keep the background bright too. If the shutter is too fast, you may get flash-sync issues—or the background may be underexposed and look dark even in daylight.
I made it sound like it’s impossible, but as you shoot, your hands and eyes will get used to the settings.
Then you’ll crouch in front of a bug and say, “In this light, at 2× with this lens at f/5.6, ISO 200 and 1/8 flash power will be great,” and press the shutter. The photo will come out dark, and you’ll ask the bug for one more pose and try ISO 400 with 1/4 flash power.
No need to go for expensive TTL-capable speedlights. Cheap manual Yongnuo units are perfectly sufficient and work with any brand. As I wrote above, you can figure out the power you need in just one or two test shots.

If you get a body with strong high-ISO performance, you can even shoot handheld in natural light. At high ISOs like 3200, you can get fast enough shutter speeds to beat hand shake. Since you’re using natural light, colors come out great. But if you decide the light’s not enough and put your subject in direct sun, you’ll ruin all that natural beauty. The photo above was handheld at ISO 3200 in shade with a Sony A7II. Full frame bodies do better at high ISO. Bodies specialized for ISO like Sony’s A7S series can shoot by candlelight. They can do much more.
5.2 Using a tripod

With a tripod we can place focus precisely where we want and keep it there. So we can leave the aperture near the lens’s sharpest value without stopping down too much, and do multi-frame focus stacking. The payoff is sharpness far beyond what handheld can provide.
With a tripod setup we have no upper limit on magnification. As long as we can suppress vibration, we can go high. We can squeeze out every last bit of what a lens can deliver. For microscope objectives—with minuscule depth of field and extreme sensitivity to vibration—a fixed rig is mandatory.
I prefer tripod and continuous light. I do tripod-based focus stacking at home and in the field. Apart from wide-angle shots, I almost never use flash.
Question 6: what’s the budget for macro?
It would be great to own everything mentioned so far all at once. I know that someone obsessed with macro will eventually chase most of it—but especially at the beginning, budget draws a hard line between options. No one wants to spend a lot right at the start. Nor should they.
Let me first share my own journey.
- My intro to photography was with a tiny Canon compact. We got along great. I used it for a very long time.
- The Pentax K-x was my first DSLR. Year: 2010.
- I bought a 1:1 macro lens—Tamron 90 mm. I shot more portraits than anything. Now and then simple handheld single-frame macros.
- Two years later I discovered you could go beyond 1×. I immediately bought a Raynox DCR-250. I felt great. Macro started for me that day. Date: April 18, 2012.
- I discovered flash. Bought an external unit. Kept shooting handheld. Date: May 14, 2012.
- I discovered reverse mounting. Bought tubes. By reversing my Pentax 50 mm and 28 mm, I got higher magnifications—still all handheld. Date: June 6, 2012.
- I bought my first tripod: Benro A-0691. I thought shooting would get easier! Date: August 10, 2012.
- I discovered enlarger lenses. Bought bellows. With the El-Nikkor 50 mm I learned what sharpness is. Date: October 2, 2012.
- I discovered microfilm lenses for higher magnification. Otamat101 20 mm was my first. Date: November 1, 2012.
- I discovered microscope objectives. My first was a Lomo 8×. Date: March 11, 2013.
- Convinced that a ball head wouldn’t cut it, I bought a Manfrotto 410 geared head. A very important step. Date: May 7, 2013.
- Realized I couldn’t progress without a fine rail. Then Newport arrived—and my world changed. I entered the true focus-stacking era. (Nov 8, 2013)
- Started using natural light. Slowly eased off flash—then quit it completely. (Dec 2013)
- A macro tripod should be sturdy and low to the ground. I lost my temper and sawed down the legs of my Benro. When that wasn’t enough, I bought a Berlebach wooden tripod. Finally, I could relax. (June 1, 2014)
- Switched to a full-frame mirrorless body. With an electronic shutter and an advanced sensor, my sharpness leveled up. (April 2015)
- Ran into vibration with a 20× objective. Discovered the limits of my support gear. (Nov 2015)
- Discovered the limits of sharpness with a Mitutoyo 5×. Somehow “there’s nothing beyond this” didn’t feel comforting—I felt something had ended. (Jan 2016)
- Discovered wide-angle macro. Its ease and pull worked wonders for my fatigue. (Jan 2016)
- Discovered slow-motion for macro video. Realized I should give mobile devices their due again. (Spring 2017)
- Despite countless attempts at relay-lens wide-angle macro—the ultimate—failed. My biggest disappointment in photography. (Summer 2017)
- Reached total saturation in photography. Put everything aside. Because of the pandemic and shifts in my interests, I closed this website. Didn’t shoot for five years. (2019)
- And now I’m reopening the site. I’d like to pick up Olympus bodies. Who knows… (2025)
Between 2013 and 2017 everything unraveled like a loose thread. I lived through a full-blown photography craze. It would fill pages if I tried to write it all. I tried countless lenses and accessories. They improved and eased my work, but didn’t change my world. The most important steps are the ones listed above.
So what can I recommend to those who want the shortest, cheapest start?
Let’s accept there are generally two paths: “inexpensive but hard-to-use gear” and “comfortable but pricey gear.” These two paths can yield roughly the same quality.
My budget-friendly starter advice is below. You don’t need to buy everything—go step by step.
- Get a good tube. Reverse mount a lens. If possible, start with a 50 mm enlarger lens.
- If you have other lenses, get a Raynox. It’s a very capable add-on for many uses.
- Get bellows—but quality ones with a built-in focus rail. Until you buy a fine rail, they’ll serve at low magnifications.
- If you prefer flash, get an external unit. Yongnuo is cheap and effective. For continuous studio light, a pair of IKEA Jansjö desk lamps is nice.
- Get a micrometer fine rail. It will change your life. The most critical—and priciest—piece in the whole set.
- Once you have a fine rail, get a microscope objective. Start at 5× or below. I especially recommend the Lomo 3.7×.
Those willing to spend more can add the following to the above:
- A 1:1 macro lens is very comfortable for general use.
- I’ve never seen anyone regret buying a Canon MP-E 65.
- Expand your enlarger-lens set. You can build many steps between 28 mm and 150 mm—your choice. I keep plenty.
- Expand your microscope-objective set—magnifications of your choice. If you can loosen the purse strings, chase Mitutoyo.
- The Olympus 65–116 is a marvelous device—structurally between a tube and bellows. Sturdy and compact. Its rotating tripod collar makes switching between landscape and portrait a breeze.
- Wooden tripods damp vibration quickly.
- A geared head that allows precise framing makes life much easier.
- Mini tripods and clamps increase comfort with their general-purpose use.
- Extra M42 and M39 tube sets always find a use.
- An extra coarse focus rail, stacked under a fine rail, is a big help.
- By using microscope stands you can build vertical setups. Highly precise and capable of very high magnifications. It’s a microscope, after all.
Warnings:
- Avoid cheap off-brand Chinese products for tubes, bellows, and rails. Adapters are fine.
- If you’ll use flash, get a wired trigger. Wireless can get on your nerves after a while.
Now, years later, I’m asking myself the same question again: what should be next? What should I chase? I honestly don’t know. 🙂 But as I learn, it’ll find a place on these pages.
Lastly, I can add the Flickr album I compiled of gear setups. You can see what different rigs look like.


