

There’s no end to macro shooting techniques. At every budget level there are plenty of solutions that can deliver good results. Those with the means can pick the best—and often the most expensive—options without any hassle. Sometimes there’s simply no alternative and we’re forced into sizable expenses. But what excites and satisfies me more is innovation, experimentation, and trying to get good results with options that don’t strain the budget.
By using very different types of lenses—sometimes in ways that stretch our imagination—we can do close-ups. These experiments usually end in disappointment. Lenses that aren’t suitable for high magnification run into issues like diffraction, vignetting, and low resolution, producing poor images. But every now and then they deliver a big surprise, putting a smile on the face of the entire macro community and sparking new excitement for all of us.
On lenses, focal length, aperture, and resolution give us clues for high magnification.
In this article we’ll look at microfilm lenses—which are quite likely to deliver pleasant surprises—and, as examples, the JML21 and the Otamat101. But first I want to thank Enrico Savazzi, who enlightened me about microfilm lenses and from whom I learned some of the information shared here. He is the author of the book “Digital photography for science: Close-up photography, macrophotography and photomacrography”, regarded as the holy book of modern macro photography. The book is sold on Amazon for $130; it used to be around $200. I’m hoping the price will drop a little more. You can also find his personal website in the links at the very bottom.
Let’s start with a bit of background.
Lenses suited to high magnification
We can force just about any lens we get our hands on to higher magnifications using different methods. But trying this with every lens would only waste our time. It’s smarter to look for certain clues first.
- Lens focal length: A suitable focal range is between 20mm and 50mm. The narrower the angle, the higher the magnification we get. However, below 20mm you have to shoot from almost touching distance, which isn’t very practical. This is especially problematic for lighting—we can’t illuminate a subject that close to the lens properly.
- Aperture: Aperture matters to avoid diffraction at high magnification. We want a fast aperture. For example, at around 20mm at least f/3.5, at 40mm at least f/4. A 20mm lens with f/5.6 will cause sharpness issues at high magnification.
- Resolution: This expresses the lens’s ability to transmit detail and is critical at high magnification. With a surprise lens we probably won’t know this value. But if we do, the higher the number, the sharper the lens. You can try a Google search for the lenses you have. To give examples from my own lenses: Pentax 18–55 kit lens 4–12 lpmm, Tamron 90mm macro lens 30–80 lpmm, Otamat101 microfilm lens 200 lpmm! JML 21mm 400 lpmm!!!! Ranges indicate different aperture settings. Looking at these numbers, we don’t even bother trying our kit lens at high magnification 🙂 Values like 200–400 lpmm are fantastic. A value of 50 denotes a very good macro lens. Keep that in mind for comparison.
Microfilm lenses
You can find these tiny lenses by searching for “microfilm lens” or “microfiche lens.” They weren’t made for taking photos. They’re typically used in projector systems to project microfilm images onto large screens. Some were produced for specialized copying devices. That’s why they look very different from the lenses we know. They don’t have an aperture—or rather, the lens always operates as if it were wide open, with the tubular barrel forming the aperture. And here’s the bad part: they don’t have a bayonet mount! We have to devise our own way of attaching the lens to the camera.
Now to our lenses. Both were discovered by the same person—yes, you guessed it: Enrico Savazzi. The “surprise” I mentioned at the beginning refers to these discoveries. The company that made these lenses had no idea they’d produced something this good. These are lenses made in limited quantities for limited industrial use and then forgotten over time. Then one day, when leftover stock surfaces at a flea market, someone tries it for macro work and the lens’s fate changes.
JML 21mm f/3.5

Here’s the story: Uncle Enrico spotted this lens on eBay in 2010. The price was $10 and a few dozen were up for sale. He thought it was worth a try, bought one, and his measurements showed the lens delivering 400 lpmm resolution with zero CA. The fact that this lens is out of production is a big loss for all of us. He then wrote about it on his website and posted on macro forums. Naturally, there was a run on the lens and all stock was quickly snapped up.
The JML 21 became a legend in no time, delivering excellent results across a very wide magnification range and up to very high values like 20×. Unfortunately it’s next to impossible to find. Those who have one won’t sell. If one does turn up, it’s around $500. In the last three years I’ve seen it for sale only once—and it was a crowded auction. I didn’t even bother to check how it ended…
I would have loved to present photos I shot myself below, but for now this lens only lives in my dreams. This time I’m sharing photos from some masters on my watch list who own the JML 21mm. Click to go straight to the photo’s page and view it larger. Of course, owning the lens isn’t enough—lighting and processing techniques do most of the heavy lifting.
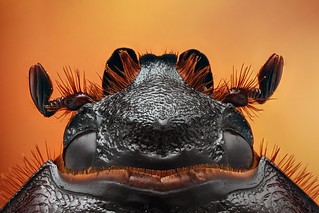 |  |
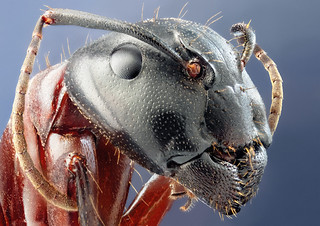 |  |
Otamat101 20mm f/2.8
You can probably guess this lens’s story. I could copy almost all of the expressions from the paragraph above!
Uncle Enrico spotted this lens on eBay in 2012. It was £18 and a few dozen were for sale. He thought it was worth a try 🙂 The story continues as you know. The lens produced very good results and sparked discussions on the forums. This time there was one difference: I was among the first to read those posts. I joined the charge and snagged one for £18. A week later the price was £80. The week after that, stock was gone. There’s no used market right now. If one shows up, I have no idea what it’ll go for.

This lens has weaknesses compared to the JML. Its resolution is lower and it shows some chromatic aberration. That said, even in this state it’s still a very good lens.
When the lens arrived, my first thought was, “How am I going to mount this?” What could be done to attach this tiny tube-shaped lens to the camera?
I did some research. Some people drill a hole in a body cap and glue the lens in, some wrap an RMS adapter with black tape, some fix it with putty-like adhesive materials… I set all of those aside out of concern for damaging or dirtying the lens. It sat in a drawer for a long time. Then I realized some microscope adapters are suitable for attaching this type of lens. Since I’m a Pentax user, I chose a Pentax-brand microscope adapter. I found it on eBay for 20 euros.

This quality adapter has an M42 mount, so it can be used comfortably with every brand like Canon and Nikon. The receiving end is made for lenses 23mm in diameter. You insert the lens slightly and tighten the threaded ring to lock it in place.
But there’s one more small issue. The Otamat101 is 22mm in diameter. That means there’s a 1mm gap to fill. To solve this, I wrapped a thick paper around the lens and, to prevent it from slipping while seating, I fixed it to the barrel with adhesive paper tape. After a few wraps it reached the desired diameter and fit the adapter perfectly. Once tightened, it felt like it had always belonged there.

It’s very important not to have an axial offset. To take maximum advantage of the lens center—where lenses are sharpest—you need to mind the axis in this kind of mount. With solutions like gluing directly, the lens may not face perfectly at 90 degrees and you could have axial misalignment issues, but the adapter held it very securely.
There’s a second point to watch: the lens has no obvious front or back! You determine it with a quick test by measuring the working distance. When mounted the wrong way it focuses extremely close—we can’t use it like that. Flip it the right way and lock it down.
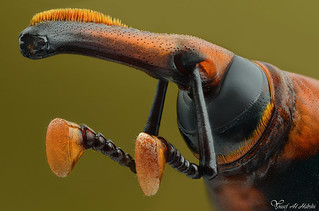
Otamat101 on the job
With bellows, tubes, and similar additions, the lens climbs to high magnifications very quickly. About a year ago, when I first made this setup, I experimented on a bellows without knowing much. In that rig the magnification came out to 12×. But I hadn’t yet set up my Newport rail system, so while focus stacking I couldn’t maintain continuous depth of field very well. In fact 12× slightly exceeds the lens’s sweet spot and reduces sharpness. These were the photos:


I forgot about the lens after that. It sat in a drawer for about a year again. My interest at high magnification had shifted to microscope lenses. Over time I had the chance to try various microscope objectives. Then, for this article, I brought the Otamat back into the light and realized it might be my best solution in the 5×–10× range. Even though I have a Lomo 8× microscope lens that can be used at similar values, I don’t like to push its magnification too much. Especially when I force it to lower magnifications, the risk of vignetting is high. Also, with a working distance of around 2 cm, the Otamat101 offers roughly twice the space of the Lomo 8×, making lighting easier.
I stumbled upon a three-piece Paragon M42 extension tube set for $1. These often come in any macro kit. Recommended.
This time I wanted to use the lens at around 5×–6×. Even with the bellows at minimum, the Otamat races to 10×, so I mounted it directly on the body with the microscope adapter. The magnification was 4.5×. Adding a 20mm M42 extension tube behind the M42 microscope adapter brought it to 5.5×, which was my target.
Next was finding a dead insect. In this season that’s the hardest part. With snowy weather outside, I looked around the house. By chance I found a “meal moth” like the one I’d shot with this lens before (above). These tiny moths are often found in homes, especially in kitchens. They come in with eggs on legumes we buy from the market. Sometimes we find them in a jar and wonder how they got there. If the jar is tightly sealed, they can’t spread to other food and end up dying there.
I set up a simple studio and started shooting.

The “helping hand” on the left holds the moth fixed to a pin in a suitable position, while the second “helping hand” in the middle holds a diffuser made from a cut picnic cup. A circular white paper slipped onto the front of the lens acts as a reflector and plays a key role in front-lighting the insect. During the shoot, the cup is placed over the lens as well, and the insect sits inside the cup. I also place additional reflectors around, but I removed them here so as not to clutter the view. There’s no tripod. I simply put the Newport micrometer rail on top of a car registration wallet!! To quickly damp vibrations created in the body as the shutter opens and closes, I prefer this kind of surface that’s both firm and shock-absorbing rather than placing the rig on hard surfaces directly.

That day I decided to shoot with flash. At high magnification I use flash for lighting because my Pentax K-x body doesn’t support an electronic shutter. So even if I’ve raised the mirror, pressing the shutter causes lots of vibration. This reduces sharpness during long exposures, but with flash it’s not very noticeable. Thanks to the very brief flash, the effect of vibration doesn’t show. When I finished and checked the result, I was disappointed. Interestingly, this time there was plenty of vibration on the insect side. The stack consists of about 80 photos. I step from front to back. The thorax area of the moth is closer to the lens and appears in the first images. The frames that coincided with vibration were those first ones. I must have been a bit careless at the start. The later frames don’t have this issue; the head is sharp. So I cropped the body area and published just the head as a crop.
Realizing this, I wanted to shoot another stack. I started a new composition, but this time the flash trigger’s battery died before I finished! I figured it wasn’t my day and processed that stack even though it was incomplete. That’s why the back of the moth is blurry in the image below—I had to stop when I reached that area.

The next day the first thing I did was charge all my batteries including the body. Then I set up again to reshoot. I framed the shot and started quickly, when the flash refused to fire. A new set of batteries didn’t help, and I realized the battery on the camera-side of the flash trigger had died! After 1.5 years of heavy use, that small watch-type battery finally gave up. Since I couldn’t replace it immediately, I changed the plan. I decided to continue with continuous light and long exposure instead of flash.
Two Ikea Jansjö LED lamps took the place of the flash in the setup. Since this would be my first time using continuous light at 5.5× magnification, I was curious about the result. The unavoidable effect of shutter vibration would soften sharpness a bit—but how much?

With the Jansjö lamps the colors came out a bit warm. The flash had given a cooler, slightly bluish feel. But my real concern was sharpness. The image wasn’t as blurry as I feared. In a test I did last year with microscope lenses I ended up with a watercolor-like image. This time I was relieved. Maybe I should thank that vibration-damping car registration wallet 🙂
To tidy up the colors a bit and try another attempt, I changed the composition and shot again. I also wanted to test something else. In the photo above the exposure time was 1/4 s. If the vibration that occurs as the shutter opens continues at the very beginning and then dies out, it could have had a significant effect within that 1/4 s. If I increased the exposure time, perhaps I could benefit longer from the stability after the vibration faded and get a sharper image!?
I moved the LED lamps away and removed the reflectors. For the first time I was trying to reduce the light! I metered the scene and got a 1 s exposure. I decided to try that. For each of roughly 80 frames, 3 s self-timer + 1 s exposure took long enough to be boring. Here’s the result right away.

Comparing the two images, the colors are better in the second, but the sharpness didn’t increase as I expected. In fact, I’d say the first is sharper. With so many parameters affecting the result, I gave up over-optimizing and decided to just enjoy the photos and the Otamat101 lens. I guess this is as far as my camera body will take me 🙂
You do come across microfilm lenses on eBay. Their prices are usually quite reasonable. But with these lenses—often with barely a proper name—what results you’ll get is pure luck. If you trust your luck, you can pick one up and test it. I’d be very happy if you share the results with me 🙂 Likewise, I’ll continue sharing my thoughts here on any microfilm lenses that come my way.
Photos shot with the Otamat101 microfilm lens


