
Mitutoyo is the king of macro! A legendary lens! A dream of many years!
At the same time, it’s an expensive microscope objective with lots of accessory needs and hard to find. In other words, there’s a long story. A bit of personal history, a bit of chaos, a bit of speculation, and a bit of technical stuff… This post is clearly going to be long.
The gear race
The days when I shot my very first photo that could be called macro are long behind me. I had no idea I’d get obsessed with this. I thought, “How fun this is!” But the urge to explore is a powerful feeling. I got carried away and devoted all my free time to macro. Countless pieces of gear passed through my hands. The drawers overflowed. I didn’t know what I was trying to reach.
The few sentences I’ve written so far actually describe a five-year period packed with photography. Rather than skimming quickly past this, I should show you the flea-market-booth scene in my bedroom to give a sense of how messy things got.

As this obsessive phase continued, I gradually realized that I enjoyed what I was doing regardless of the gear I used. Whether I used my cheaper lenses or the pricier ones, the photos I produced satisfied me.
At one point, out of curiosity, I did a test with a very affordable lens—around 30 euros—that’s not at all suitable for macro, and published it as a post: Macro test with the Tokina 80–250 zoom lens. Looking at the results, I felt I should be a bit more sensible. Even if the gear on hand is poor, when used correctly the outcome isn’t bad.
Then John Hallmen ran a poll. In response to the ongoing debates of the time—“this body is better than that one,” “that lens beats this one”—he posted photos shot with competing systems and asked people: “Guess which photo was shot with which!” You can guess the outcome. They couldn’t. Hallmen summed it up nicely: “A good photographer makes a good photo with any of them!”
After all this, my head cleared. I would call a halt to the gear race. (Or would I?)
Price / performance balance
What we wonder with every purchase is how much value we’ll get for the money we pay. Looking back at my own decisions, since I was constantly shopping from abroad—and influenced by the customs tax limit of 75 euros at the time—I see that I gravitated toward lower-priced items.
I tried lots of second-hand gear—some forgotten, some undiscovered. With some I hit the bull’s-eye (like the Lomo 3.7× and Componon-S 80mm). Those lenses later became famous and their prices skyrocketed. Others turned out to be so bad they were only fit for display (like the Lomo 20×).
But overall, I made very good investments. I recommend a similarly slow and low-risk plan to anyone new to macro. Give yourself time to get to know both yourself and your gear, and don’t spend big until you absolutely love macro shooting.
Don’t say, “We still haven’t gotten to Mitutoyo—what is this guy going on about?” It really does take a while to get there; I’m trying to convey that feeling. The stage we’ve reached here is a kind of limit. With this much gear you can keep shooting forever and be happy. End of story.
Luxury goals
Or you keep raising the bar and accept paying a lot more for something that’s perhaps only a little better. Usually you do this for one of two reasons.
- Modern and expensive lenses with eye-catching MTF values, sparkling coatings, and review articles that reek of marketing start winking at you, and you get an itch.
- As you get older, you don’t have as much energy! You might say this is unrelated, but here’s how. We have a macro chat group of 6–7 people. Are lenses our popular topic? Actually yes 🙂 But we often talk about these too:
- Friend A: Eyes have gotten pretty bad; can’t read the micrometer markings.
- Friend B: Cervical hernia… Doesn’t want to bend down to shoot.
- Friend C: Lumbar hernia. Also can’t bend.
- Friend D: Just had eye surgery.
- Friend G: Let that be me. Also had surgery and hasn’t been able to shoot properly for two months.
Best wishes to us all. I hope they’re laughing as they read 🙂
An expensive piece of gear doesn’t always produce a higher-quality result. That’s what I meant by price/performance. I tried to stay away from the “itch” in item 1 as much as possible. For example, while I had the Componon-S 80mm and the Lomo 3.7×, I didn’t also chase an MP-E 65mm. I invested more in the “low energy” angle I mentioned in item 2. In other words, I allocated extra money to what you could call luxury items that provide comfort and speed in shooting along with ergonomics—like a modern body, a quality tripod, a quality rail, a quality bellows.
Then the itch started too!
Choosing the next lens
I wanted the next step to be a big one. I had different lens options I could use for a given magnification, but I couldn’t keep using one and say “this is the best.” Because it wasn’t clear which was better. I needed to find the “best lens” that would make a clear difference and commit to using it exclusively for that magnification.
First I had to choose the magnification. Grouping by usage values, I can separate them as wide-angle, 1:1, 2×–3×, 5×, and 10×. Up to 5× I wasn’t struggling anyway. Looking at 5× and 10×, 10× seemed too troublesome. Since 5× appeals more to general use, I chose that.
The lens I’d pick for 5× had to be one that would close the book on 5× forever! And the choice was already clear: the Mitutoyo M Plan Apo 5×.
Mitutoyo
I don’t remember when I first heard the name Mitutoyo. But I vividly recall how the sample photos I saw made my jaw drop. All the world-renowned macro photographers owned a Mitutoyo. If all of them preferred it, they must have known something! Looking back at my emails, I see I was intent on buying a Mitutoyo and doing price research around 2012. So it’s been in my dreams since my early macro days.
The Mitutoyo is an infinity-corrected industrial microscope objective. That means we have to use it mounted in front of another lens of 200mm focal length. We call that lens a tube lens, and the tube lens’s quality directly affects the result. Choosing the tube lens will stand before us as a separate challenge and expense.
So why Mitutoyo?
- Mitutoyo is a very sharp lens. Contrast is also very high. Blacks are truly black. It’s sharp enough to hurt your eyes 🙂 On first use you may even feel the image is overly sharp and artificial!
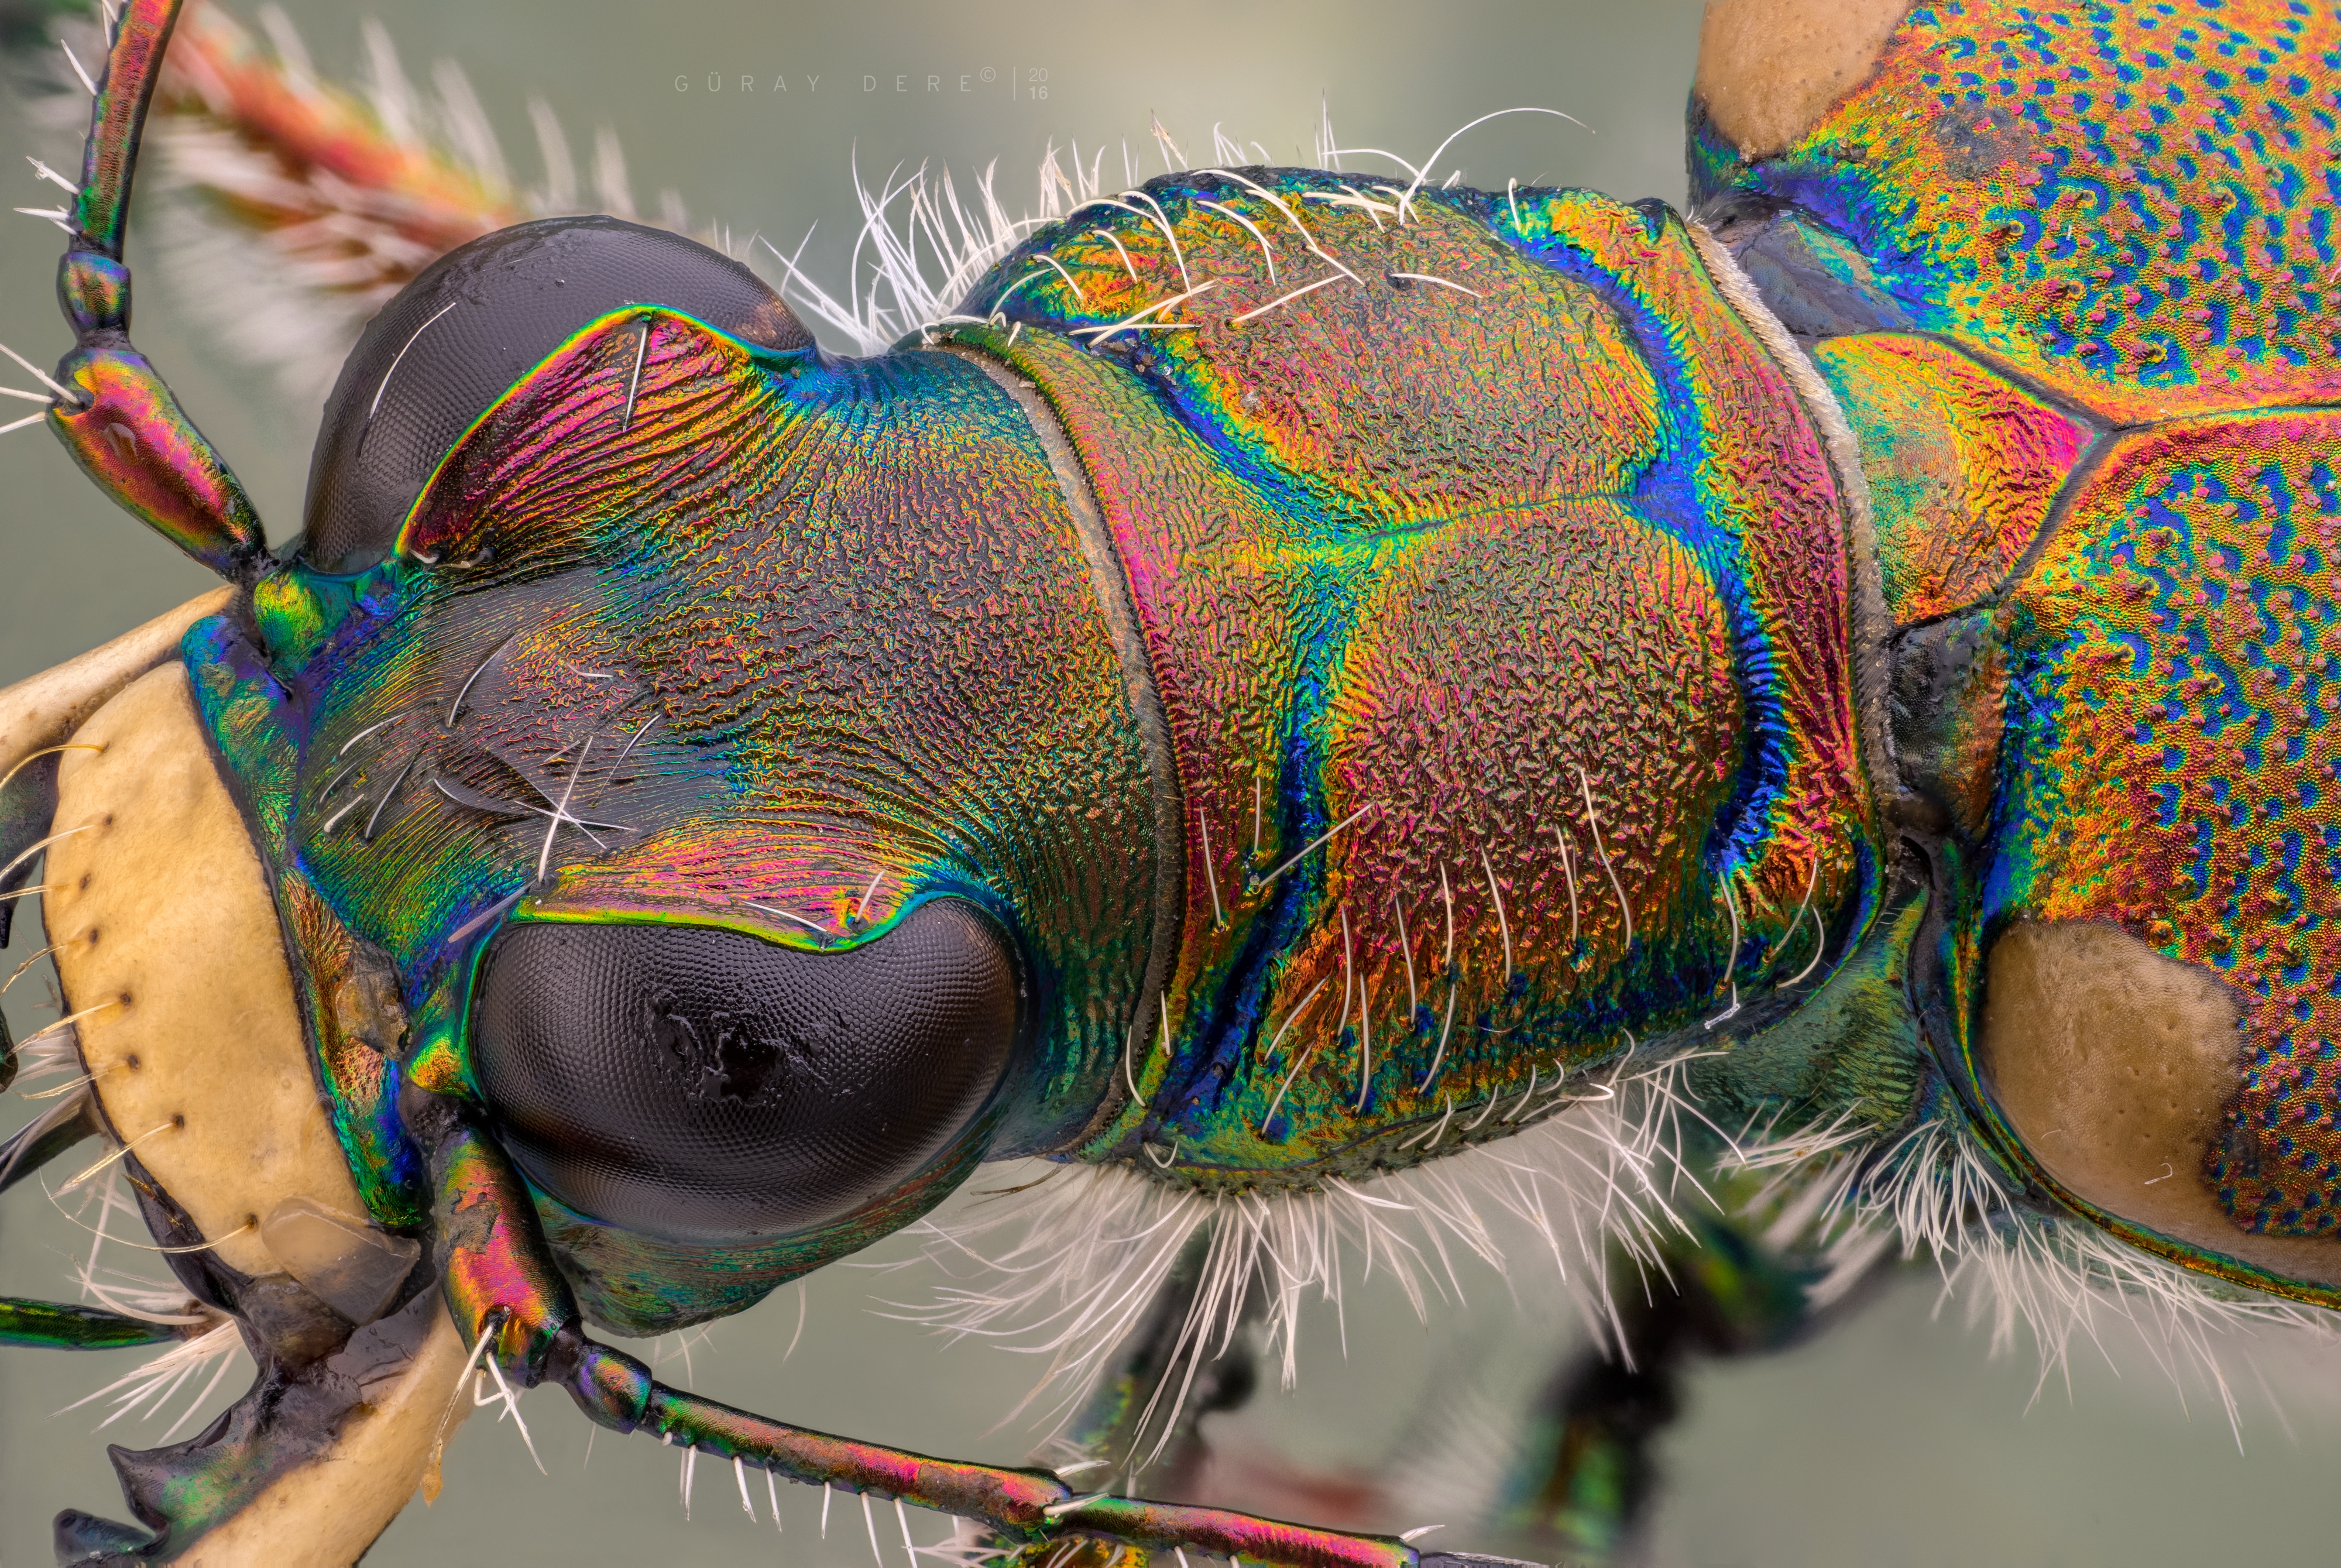
- A true APO. You don’t get CA color fringing with this lens. You get natural colors. Most microscope objectives show serious CA. I learned how white “white hairs” really are with this lens. They weren’t pinkish or bluish!
- Mitutoyo forms an image wide enough to fill a full-frame sensor. In other words, it’s full-frame compatible. You won’t have vignetting or soft corners.
- It has an incredible working distance. Most microscope objectives focus so close they’re almost touching the subject. You can’t light the subject; the lens’s shadow and its own reflection on the subject are huge. That’s not the case with the Mitutoyo, and lighting the subject is easy.
- When doing focus stacking, the framing doesn’t change as we focus to different depths! Those who know its value, know. Although Mitutoyo isn’t fully telecentric, thanks to the working distance the perspective doesn’t change, bringing great efficiency and ease in processing the photos. With other microscope lenses, changes in framing and perspective can be so large that the final photo shows only half of what you saw in the first frame. Then half of the composition in the first frame becomes trash. Because changing frames during stacking must be resized by the software to align, shifts occur that affect the image’s resolution. With Mitutoyo, the image is always full frame and resolution is always top-tier.
Let’s buy a Mitutoyo!
Not so fast, of course!
First of all, it’s an expensive lens. For the U.S., the official seller Edmund Optics lists $705 for the 5× and $885 for the 10×. European prices are in euros and higher than in America. I don’t know the postage, but it’s clear there’ll be a nice customs fee on top.
Options like eBay are easier, but there’s a trust issue. You need to find sellers you can be comfortable will deliver a truly new lens. But since PayPal isn’t available in Turkey these days, that door is currently closed anyway.
The Turkish distributor lists 1,141 euros for the 5×. Add VAT to that and it exceeds twice the U.S. price.
Although second-hand is cheaper, I don’t recommend it at all. Mitutoyos are industrial lenses. They may have been used under very harsh conditions. While their boxes say things like “Please don’t drop!”, you might come across lenses that were kicked around. Indeed, a friend had a very bad experience with a used Mitutoyo. The lens arrived in worse condition than expected, and while trying to repair it, it became completely unusable.
Note: Never open a Mitutoyo for maintenance or repair! They’re assembled in robotic environments with micron-level precision. Even if the glass elements don’t change position, rotating slightly in place can cause issues. If opened for repair outside their own service, they don’t return to their former state.
Well?
Well, it’s not possible to say which path to take for purchasing. I waited a long time for a suitable opportunity. After setting the Mitutoyo 5× as my 2016 goal, things progressed quickly in a good way. Before PayPal shut down, a good buying opportunity arose on eBay.
All the shots and explanations below were done with the Mitutoyo 5×. But all Mitutoyo models—especially the 10× and 20×—are superbly suited to macro. All the praise applies to them too.
First impressions


My package finally arrived. I opened it with great excitement and there it was—Mitutoyo!
The first striking thing is the size. It’s very large for a microscope objective! When you pick it up there’s a second surprise because it’s very heavy! A real beast. In a pinch you could use it for self-defense! You might crack a skull or two. Let’s see how it looks next to the Lomo 3.7×, which is an average-sized microscope objective:

Mitutoyo is a giant. Thanks to this huge front element it can provide both high NA and a long working distance at the same time. Like so:
- Mitutoyo 5×, NA 0.14, working distance 34 mm
- Mitutoyo 10×, NA 0.28, working distance 33.5 mm
These are incredible figures. A 10× objective focusing from about 3.5 cm is like a dream 🙂 My cheap Nikon 10× falls short at NA 0.25, and its working distance is only 7 mm. Looking at the glass size, the reason is obvious. The Nikon’s front element is the size of a pinhead!
Note: Use NA values only to compare objectives of the same magnification. Don’t decide based solely on NA. If you grab some random 40× objective with NA 0.65 and think it will deliver more detail than the Mitutoyo 5× with NA 0.14, be ready for disappointment.
Now it’s time to use this big guy. Our next challenge is choosing the tube lens.
Tube lens
Tube lenses are used focused at infinity.
I said we need to use a 200 mm lens as the tube lens. For lenses with other focal lengths, we can calculate the resulting magnification by proportional math. I had candidates among both everyday lenses and enlarger lenses.
- Componon-S 80mm
- Makinon 80–200mm
- Pentax K 200mm f/4
- Pentax K 135mm f/2.5
If I attempted to compile commonly used tube lenses, the list would be very long. I’m only covering the lenses I personally own and was able to test directly. There are even people using tube lenses far more expensive than the Mitutoyo itself.
Of course, it’s not easy to use just any lens as a tube lens. You need adapters to convert the candidate’s filter thread to an M26 mount. Unlike most other microscope objectives, Mitutoyos are not RMS but M26. And the M26 thread pitch is an odd one: M26×0.7.
Two of my Pentax lenses have 58 mm filter threads, so I had previously bought a 58 mm–M26 adapter. I wish I’d bought it not earlier, but much, much earlier! The adapter must have been made to order, because it arrived even after the Mitutoyo—and the paint was still tacky and wet! I had to let it dry for two more days before using it. You don’t want to glue your Mitutoyo to the adapter, do you?

As usual, I line the necessary parts of the adapters with a light trap so internal reflections won’t hurt the photo. The inside of this adapter has a metallic surface that could reflect. Those areas are all covered with a light trap. Don’t let the white paper seen on the inside of the left adapter in the photo above confuse you. That part is outside the optical path. The optics only see the hole. Otherwise I wouldn’t miss such a detail. In the area the lens sees, there must never be a reflective section.
When using an enlarger lens as the tube lens for testing, I used other adapters to step the filter size up to 58 mm and then used the same adapter to mount the Mitutoyo.
Mitutoyo objectives have M26-type mounts.
Some candidates gave odd magnifications and serious vignetting, while others weren’t suitable in terms of sharpness. Deciding would be harder than I thought. In the many test shots I did with graph paper, I reached very different results, as you can see in some of the examples below.


The ideal tube lens should be 200 mm. Using the Pentax 200 mm, which looked promising among them, I picked a grasshopper from my specimen drawer for a proper test. The shooting phase was very exciting 🙂

The result put a big smile on my face 🙂 From the very first shot, Mitutoyo showed its strength not only in detail but also in color. I’m going to have a lot of fun with this lens. But there’s a problem: the grasshopper is huge! At 5× magnification, its portrait spilled out of the frame. I needed to do a second shoot by using a 135 mm tube lens to run the objective at a lower magnification. This time the magnification will be 135 / 200 × 5 = 3.4×. I’m a little worried. Since I’m using a full-frame body, the chance of corner issues is high.

Again, happy results 🙂 Even though there’s a slight loss of sharpness at the corners, it doesn’t matter. It’s quite feasible to bring the lens down to 3.5×. This was delightful. With most microscope objectives, you can’t achieve a ~30% reduction in magnification—especially not on full frame. Mitutoyo earned another round of applause.
Changing magnification / framing
This grasshopper is a good example. Since 5× was too much, we worked at around 3.5× with another tube lens. In other words, changing framing and magnification according to the subject’s size and shooting angle is very important.
But what if I didn’t have a 135 mm lens? How would I reduce magnification then? Or what if I needed 6×? Don’t we have the right to want just a bit more magnification?
We have two solutions.
- Use a zoom lens as the tube lens. For example, with a 70–300 zoom, changing the focal length gives different magnifications. At 200 mm you get the nominal magnification; at 300 mm you increase magnification by 1.5×. However, zooms are usually not very sharp. I only have one old 80–200 zoom. With the 80–200 I got very bad vignetting and gave up on zooms entirely. Trying other zooms is up to you.
- Use a bellows. In normal macro use, we set magnification by extending the bellows; with a tube lens it’s the same. If we mount the tube lens on the front of the bellows, we can increase magnification by extending the bellows. But if we want to both increase and decrease magnification depending on the situation, we need a different option.
Using a Raynox as the tube lens
You know the Raynox units. They’re famous as very high-quality close-up add-on lenses. Two models stand out: the DCR-250 and DCR-150. I’ve been using the DCR-250 for a long time and even wrote a post introducing it: Macro close-up filters
The DCR-250 is +8 diopters. As a focal length that’s 1000/8 = 125 mm. So the DCR-250 can be used as a 125 mm lens. If we mount it on the front of a bellows and then mount the Mitutoyo in front of that, we get a 125 mm tube lens. If the Raynox-to-sensor distance is 125 mm, the DCR-250 will be focused at infinity. In that case the magnification is 125/200 × 5 = 3.1×.
If we want to go up to 5×, we continue extending the bellows. In fact, by extending more we can reach around 7×. I stayed around 5× and did a sample shot. The result was very satisfying.
Since the Raynox is also very light, it makes handling much easier. Together with the bellows it offers a very flexible solution.

After this stage my tube-lens research continued and I saw very positive comments about the other model, the Raynox DCR-150. With 4.8 diopters its focal length is 1000/4.8 = 208 mm. Its closeness to 200 mm makes it look like a better candidate.
You can order the Raynox add-ons directly from Amazon. That’s what I did. They come straight to your door. Prices are usually better than buying in Turkey.
The recommended mounting method is to use the Raynox reversed. This supposedly gives better corner sharpness, especially on full-frame bodies. I decided to develop my rig in that direction and ordered the DCR-150. But while chasing perfection, another point caught my attention: the aperture!
The background problem with microscope objectives
Let’s look at the problem first. Microscope objectives are unrivaled in sharpness, but they have a challenge. Depth of field is extremely shallow! You might say, “So what—we do focus stacking for that anyway.” True. Still, there’s an aesthetic issue that bothers me.
Example: A longhorn beetle portrait shot with the Lomo 3.7×
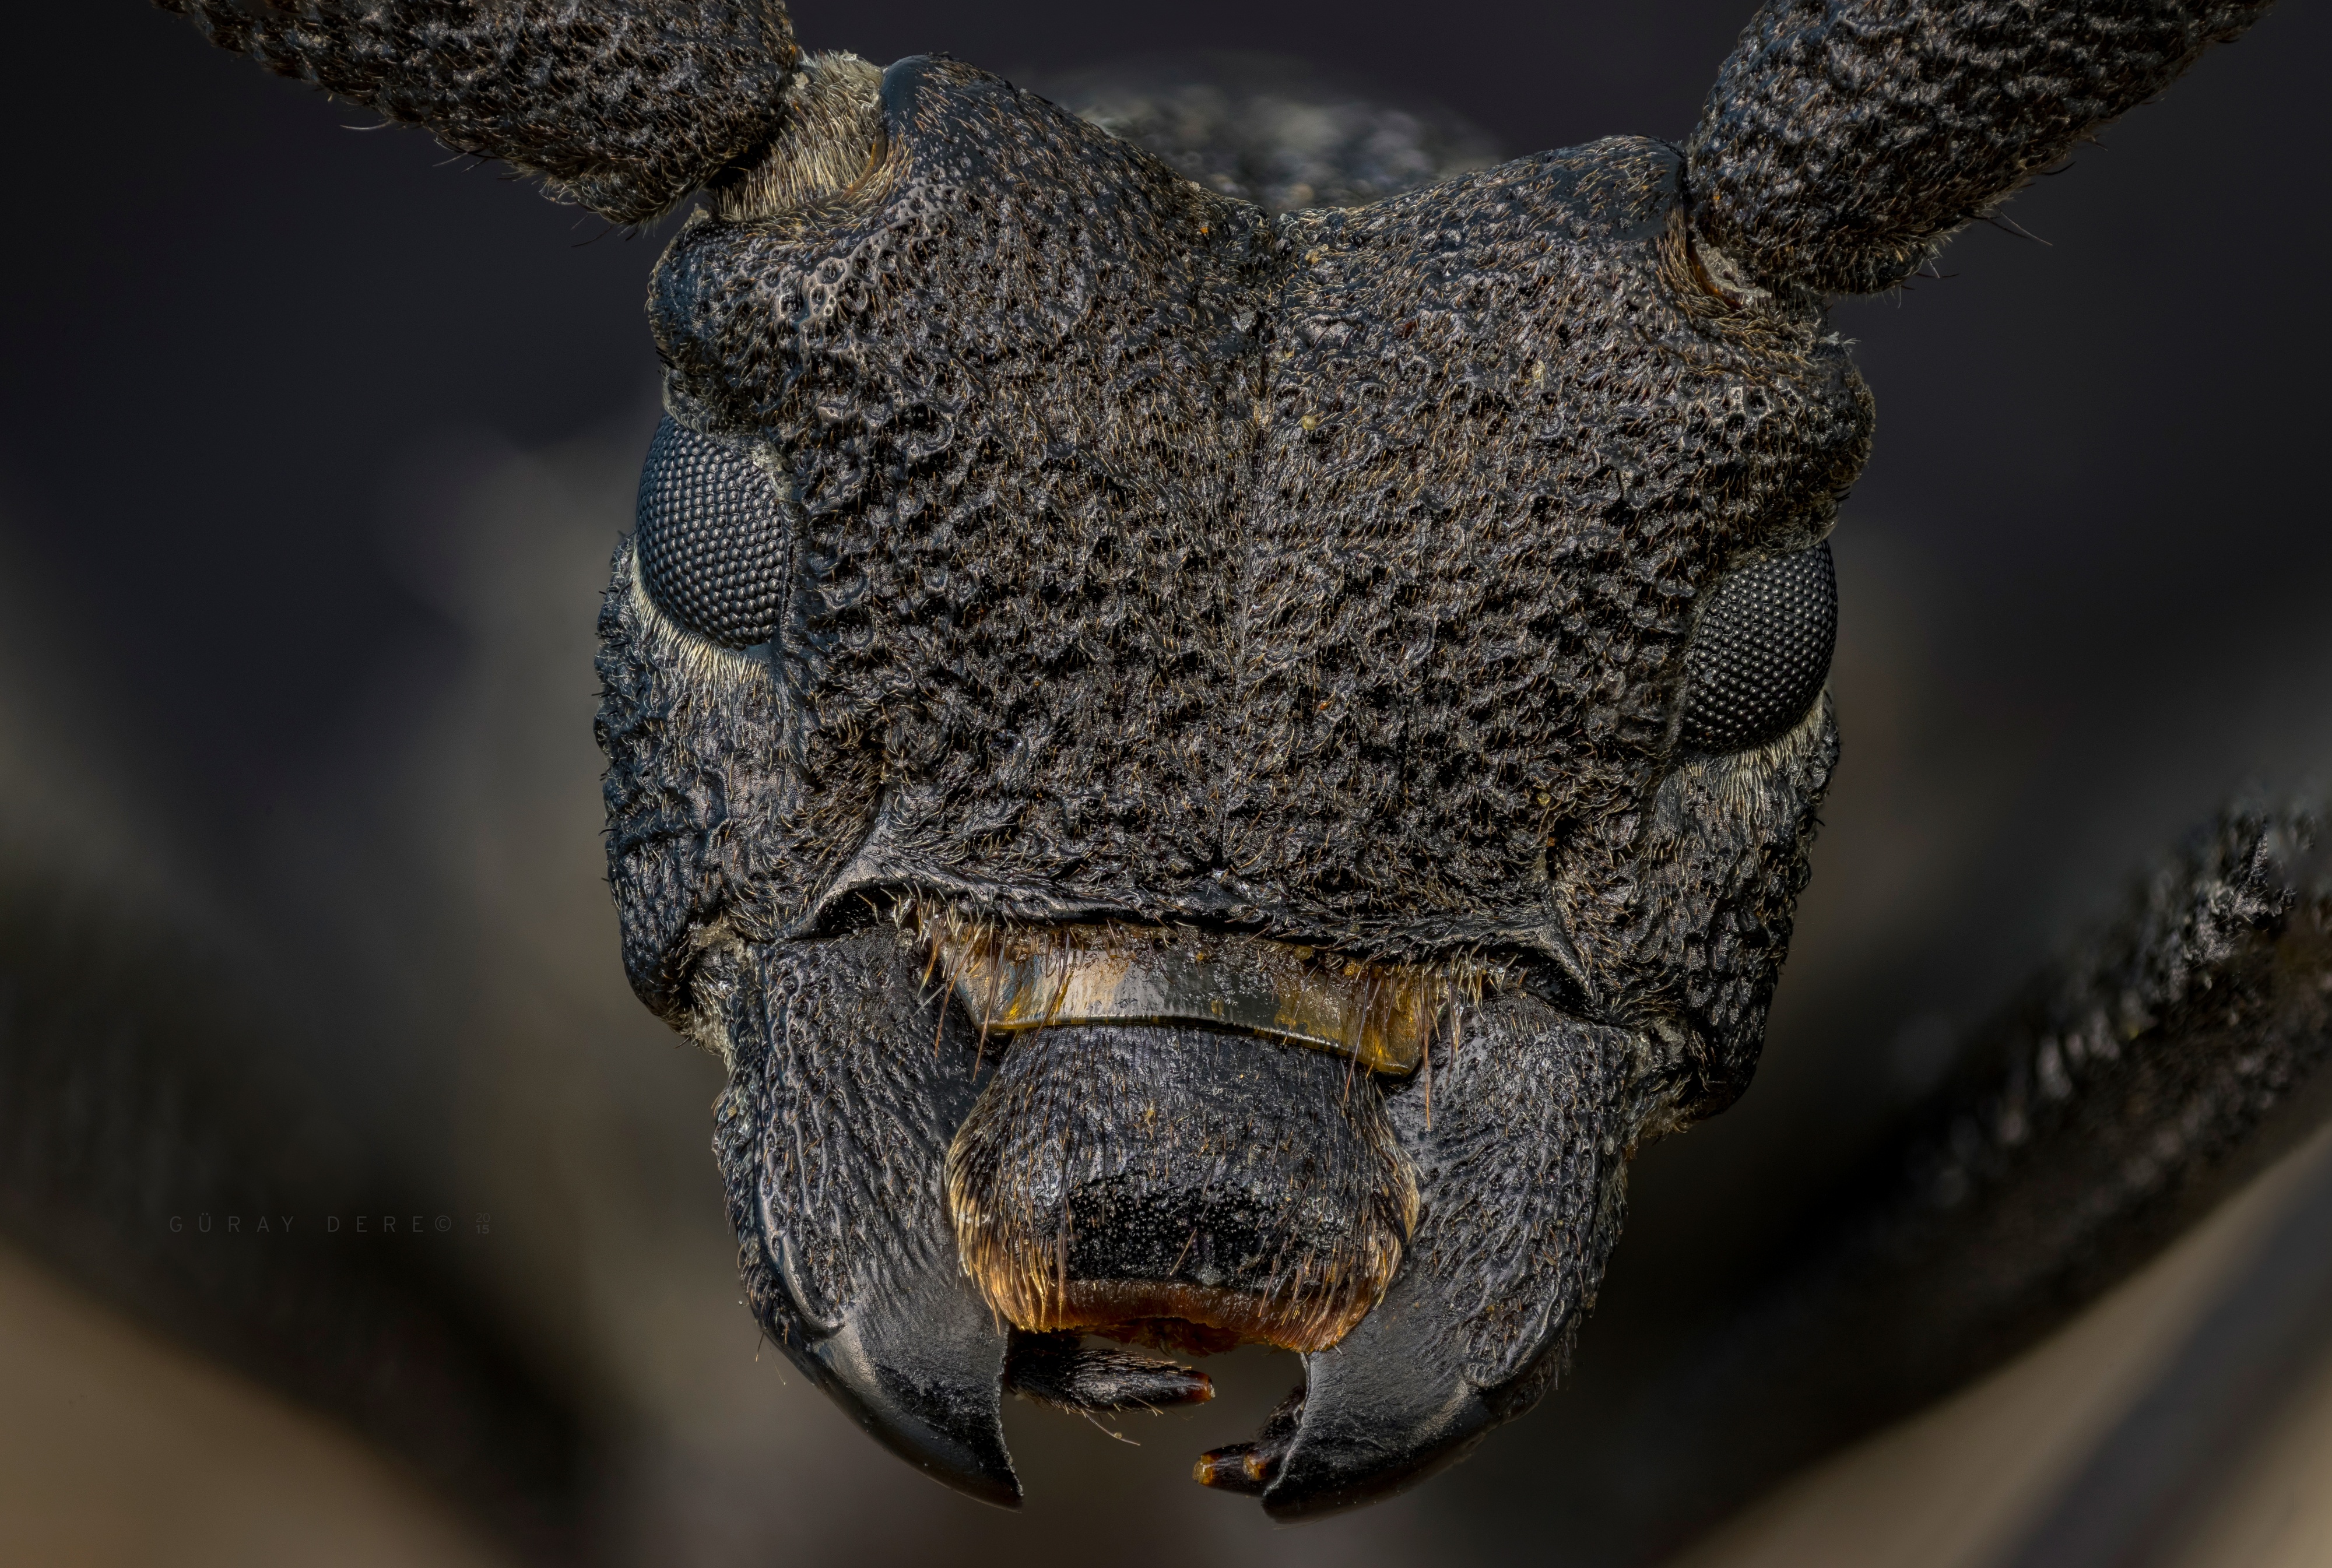
Now look at this photo—zoom in if you like; I posted it at 4000 px. There are great details 🙂 You could call the Lomo 3.7× a mini-Mitutoyo. But something is unsettling. Of course the insect has a body and it continues into the background, but it falls into blur so quickly and harshly that it’s as if it popped its head out from another dimension. The insect’s head looks like a severed mask. Wholeness and depth have suffered.
In this 61-frame stack, the in-focus slice is razor-thin in each frame. When combined, the head becomes crystal sharp—but then what?
For the “then,” we’ll use an aperture.
Aperture
Our normal lenses have an aperture. When we want to make the background more discernible, it comes to the rescue. By stopping down we increase depth of field as much as we want. Since microscope objectives have no aperture, we don’t have that option.
Or do we?
Yes, we do! We can use an external iris. If we place an external aperture right behind our microscope objective, we can stop it down to increase depth of field.

Normally, stopping down with a microscope objective isn’t a good idea at all. Since we’re already operating near the diffraction limit, stopping down quickly costs us sharpness. But in two cases, doing this is a very good idea.
- With lenses that produce serious CA, stopping down 1 stop can strike a balance between sharpness and CA and also increases depth of field, allowing you to work with fewer frames.
- If, when finishing a focus stack, we shoot only the last (furthest-back) frame stopped down, we can make the background more visible and provide depth and continuity in the photo. Since that last frame targets the already blurry background, the sharpness loss from stopping down won’t matter.
For example, I had stopped down slightly with the Nikon CF Plan 10× to reduce CA. External irises aren’t specific to a lens, so they don’t have marked values. They also operate continuously rather than in click-stops. So when we say “let’s stop down one stop,” we can’t do it haphazardly without measuring. Here’s how I measured it:
With the aperture wide open, I metered the exposure time. Let’s say it gave 1 s. Then I kept stopping down little by little and kept reading the exposure time. When it read 2 s, I stopped there. When exposure time doubles, we know the aperture has been reduced by one stop. Similarly, you can calculate other aperture changes by ratios based on exposure time.
To show the depth-of-field effect of the aperture, I’ll share two photos shot with the Mitutoyo 5×. The first has the aperture fully open (i.e., no iris); the second is with the iris stopped down significantly.


I think my point is clear 🙂 The last frame isn’t razor-sharp, but the aperture brought out the background and did its job very well. When we add this final photo to the stacking sequence, the background will blend in smoothly. You can find the processed final version of this sample and more at the very bottom.
Building the setup
I’ve written and drawn all this, but I haven’t said how these many parts attach to each other. If you haven’t asked, you’re in trouble. We have a puzzle on our hands. Let’s get to that side of things now. You’ll have to tinker to build this setup, spend money, and wait a long time for orders to arrive. My plan is to save you (just as it happened to me) from spending more money and waiting longer on mistaken orders and trials.
Here’s the beauty we’re working to create:

I admit, when this setup was complete I admired it for a long time. The kid in me wanted to shout, “Voltron! Voltron! Voltron!” Those under a certain age might not know this cartoon—when all the parts come together, the giant robot Voltron appears and kicks up a storm!
Now, gather round if you want to feel the same excitement.

A pinch of bellows, extension tubes to taste, one fresh Raynox, enough adapters, a medium-sized iris, and a brand-new Mitutoyo 🙂 That’s our recipe. The baked version will look like the one above. Now we’ll look at these ingredients one by one.
There’s a component not pictured here that I can’t skip reminding you of: a precision rail. The bellows rail won’t cut it. For the Mitutoyo 5× I shoot with 20-micron steps. Without a micrometer rail, you can’t produce a focus stack that’s consistently sharp. You can’t really proceed until you solve the rail issue.
The second point is the bellows. If you’re going to use a 200 mm lens as the tube lens, you don’t need to go to all this trouble. But many users, including me, find the Raynox DCR-150 very successful and choose it as the tube lens for infinity-corrected objectives. Using a bellows provides great flexibility in changing magnification. I recommend this type of system if you can manage it.
If the rail and bellows are sorted, we can lay out the remaining parts on the floor:

Of course, nothing makes sense yet. Let’s take them in order.
- An extension tube to match your bellows. I use a Pentax bellows, so my tube is Pentax mount. A tube isn’t mandatory. Since the Raynox DCR-150 is 208 mm, the Raynox-to-sensor distance needs to be 208 mm to focus at infinity. That’s the ideal. If your bellows is small and doesn’t extend enough, we can support it with an extension tube. Or if you want to increase magnification further, an extension tube helps again. I keep one on for flexibility. It lets me get 5× without pushing the bellows to the limit, and when I want I can extend the bellows a lot and go beyond 5×.
- A reverse 49 mm adapter. Since the tube is Pentax, it’s a reverse Pentax type. If your system is different, yours will be the corresponding reverse 49 mm.
- Raynox DCR-150. We mount it reversed. So the 49 mm female side faces inward. The outward-facing side of the Raynox is male 43 mm.
- A 43 mm–49 mm adapter. The 43 mm side of this adapter is female and faces inward. The outer side is male 49 mm. The reason we use this is actually to be able to use the next adapter, because we need a female-to-female conversion somewhere in the chain.
- A 49 mm–49 mm female-to-female adapter. To enable the next part of the chain, a female-to-female conversion became necessary. There aren’t many adapters that can do this. After researching, I could only find a 49–49, so I had to use it. Adapters 4 and 6 were also needed just to be able to use #5.
- A 49 mm–52 mm adapter. The 49 mm side is male and faces inward; the 52 mm side is female.
- A 52 mm–M42 adapter. The 52 mm male side faces inward; the outward side is female M42.
- An M42 iris. How to mount it is obvious: male side inward, female side outward.
- An M42–M26 adapter. We finally reach M26. Naturally, the inner M42 side is male and the outer M26 side is female. After this comes the Mitutoyo.
If we’re using a different infinity-corrected microscope objective with an RMS mount instead of the Mitutoyo, the last adapter, #9, will be M42–RMS. Everything else remains the same.
This male/female business is very important. Mistakes are common. We need to pay close attention to ensure the product we’re buying is suitable. Otherwise, before you know it, male-male or female-female ends are facing each other! No matter how hard you try, adapters do not favor that kind of relationship! In such a case we bow our heads and place a new order.
By the way, the solution above isn’t the only one. As manufacturers release different and more flexible adapters, you can develop other connection schemes.
Using it without a tube lens
Before closing this tube-lens topic, I need to satisfy my curiosity a bit more. What happens if I mount the Mitutoyo directly on the front of the bellows and don’t use any tube lens? Some optical diagrams drawn for infinity-corrected objectives are confusing—it looks as if a tube lens might not be necessary. Forum discussions say that using it without a tube lens will produce an image but with some issues. We shouldn’t proceed without seeing the extent of those issues, right?
Removing the Raynox from the setup above and continuing the chain is quite easy. No new adapter is needed. In the parts list above, removing #3 and #4 is enough. I immediately rearranged the system to run this test. I had a jumping spider in my sights.
With the tube lens removed, the Mitutoyo indeed forms an image. And in a way I didn’t expect at all: it magnifies much more. To set it to exactly 5× I use graph paper, and I need to shorten the bellows quite a bit to do that.

The result is quite good! Good enough to turn many lenses I’ve used so far upside down. But it’s not perfect. Normally colors come out completely natural, but this time there’s slight CA. Contrast is a bit lower overall. And there’s noticeable corner softness. With a touch of Photoshop, these issues can be reined in and you end up with a very nice image.
The Mitutoyo can be used without a tube lens! Would I recommend it? No. If you can get an even better image with a tube lens, why go without? But we fought a good fight; it was a nice test.
Before wrapping up, there’s one more thing to check. Since we can get 5× even with the bellows shortened, what happens if we extend it? I extend the bellows and take another shot.

I say 10×, you say 15×. Anyone want to raise?
With a realistic estimate I can say it’s somewhere between 10× and 15×. When I extended the bellows, the magnification really took off. But even though our lens is a Mitutoyo, under this much strain it starts to groan. The result is usable, but far from the sharpness I’m used to. I don’t enjoy processing this photo.
With microscope objectives, NA values also represent the level of detail you’ll get. When we push a lens beyond its intended use, magnification increases but NA does not. In that case we can say the level of detail doesn’t increase much either.
When the Mitutoyo 5× with NA 0.14 is made to work at 10×, it’s far from the Mitutoyo 10× with NA 0.28. For the same photo, the right choice is a 10× objective. I’m eagerly awaiting the day I can get a Mitutoyo 10×.
Final words
The Mitutoyo 5× is one of the best purchases I’ve ever made. I’m so glad I bought it. After showing the results, I got many friends to buy one too. There’s already quite a community of Mitutoyo users in Turkey.
The Mitutoyo delivers fantastic detail. Please click this photo and examine it at full size. I posted this one at 4000 px as well. There aren’t many lenses that can deliver this level of detail at 5×.
If you don’t want to stretch your budget, chase another gem: the Lomo 3.7×. Most of the time you won’t miss the Mitutoyo.
Even with such a beautiful lens in my hand, I can’t produce a huge number of photos. The reason is that each work consists of around 150 frames. Shooting them is the easy part. The time spent at the computer afterward is really long. Since you’re loosening the purse strings, it’s a good idea to get a fast computer too. Sleepless nights await 🙂
My sample photos with the Mitutoyo 5×


